
Whether your desktop keyboard died on you or you simply want to streamline typing across machines, your trusty laptop can step in as a full-blown external keyboard for your desktop PC. No, you don’t need any hardware modification. With some free apps and a quick setup, you’ll be typing on your PC from your laptop.
Note: if you don’t have access to your desktop PC’s keyboard, you can use Windows On-Screen Keyboard or Touch Keyboard to set up the methods below.
1. Use Network KVM App
A network KVM (Keyboard, Video, Mouse) software will share your device peripherals like keyboard and mouse with other PCs on your network. This will allow you to seamlessly use both your touchpad and keyboard between your devices. Mouse without Borders is a great free tool for this purpose.
After initial setup, you’ll be able to move your mouse cursor between both your laptop and the PC, and your keyboard will input data on whichever has cursor focus.
Here’s how to set it up:
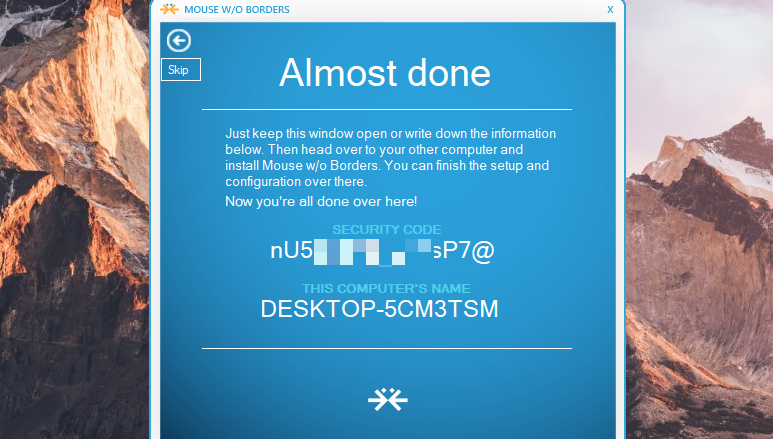
Install Mouse without Borders on both the laptop and desktop. First, launch it on your desktop and select No on the setup confirmation prompt to reveal a security code and computer name.
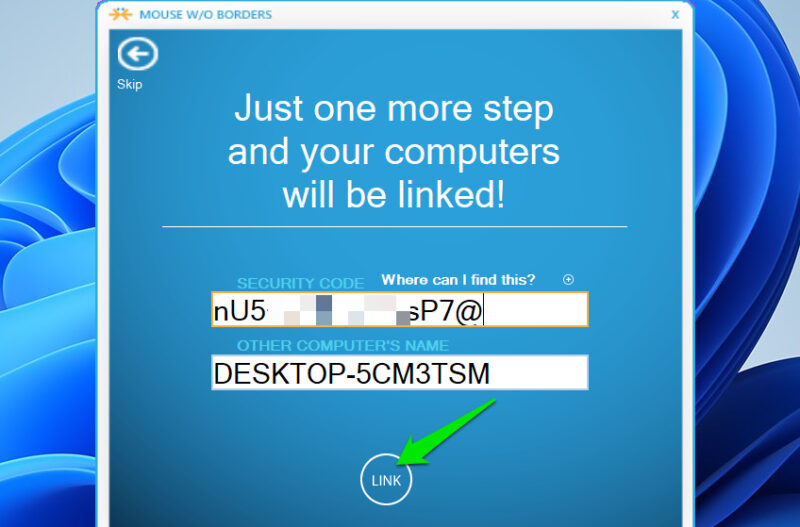
Now, launch the app on your laptop and select Yes on the prompt to get fields to enter the security code and computer name. Enter the security code and the computer name you see on the desktop, and click on Link.
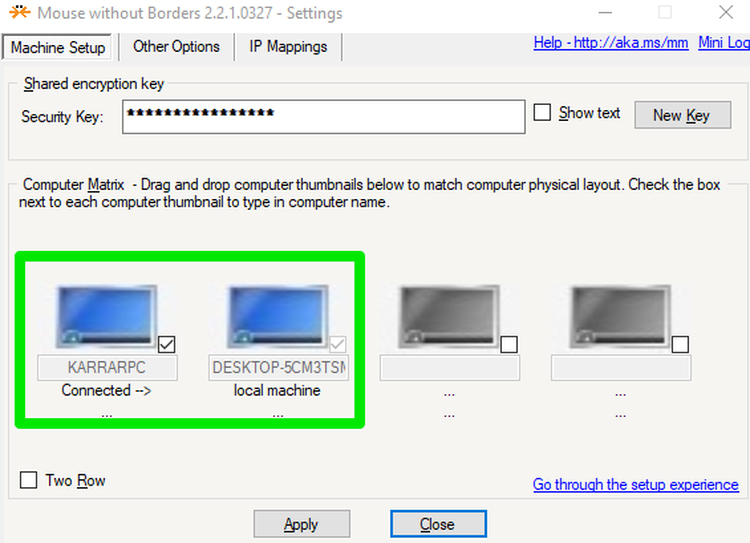
Once connected, you can just move your mouse across the corner of your laptop screen, and it will show up on the screen of your PC and let you use the keyboard as well. In the app’s interface, you should also adjust the position of your laptop and desktop, as the cursor can only jump to the PC from one side of the screen.
Apart from using a keyboard and mouse, it also allows you to copy/paste data from one device to another, including files below 100MB.
2. Use USB Virtualization App
USB virtualization programs virtualize all USB-based devices and let you connect them to PCs over the internet. Since most laptops use the HID protocol for the keyboard, you can virtualize it as a USB device to use with your PC. Your PC will see it as a physical USB keyboard getting attached, so it will treat it like one.
However, your keyboard will also become unusable on the laptop since it’s basically removed and attached to the PC virtually. We’ll use Free Virtual USB for this, since its free version is enough to connect a keyboard virtually without any limits.
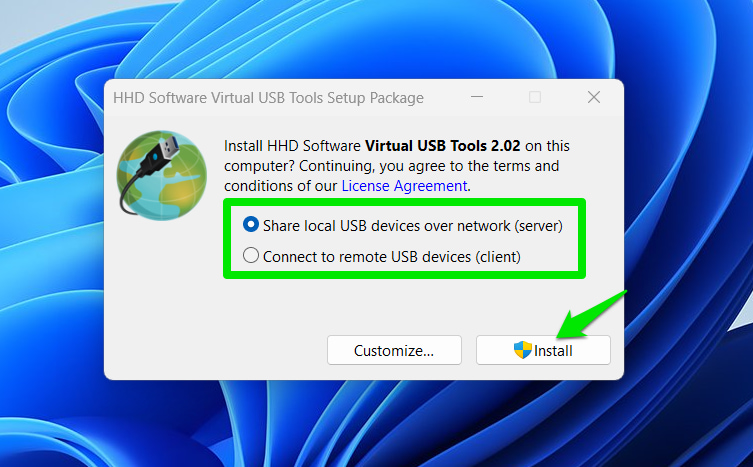
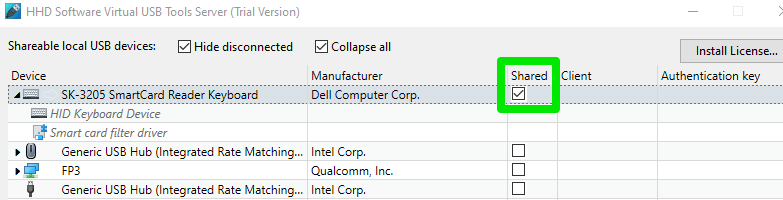
Install it on both the desktop and laptop. While installing, select the Server option on the laptop and the Client option on the desktop. You’ll have to restart both devices after installation.
Now, launch the server on the laptop, and you’ll see all USB devices that can be shared. Next to your keyboard, click on the checkbox under the Shared column and confirm the prompt. This will make the keyboard visible to the client. Open the Free Virtual USB client on the desktop and select the keyboard to install and use it.
Unlike a KVM program, the keyboard will not depend on the mouse’s location to use. It will also bypass program restrictions like DRM-locked apps or apps that block remote sessions.
3. Use Remote Desktop Software
Instead of just connecting the keyboard, you can also take complete control of your desktop from your laptop and do everything from the laptop. A remote desktop software can allow you to fully control a device over the internet, including using the keyboard for input.
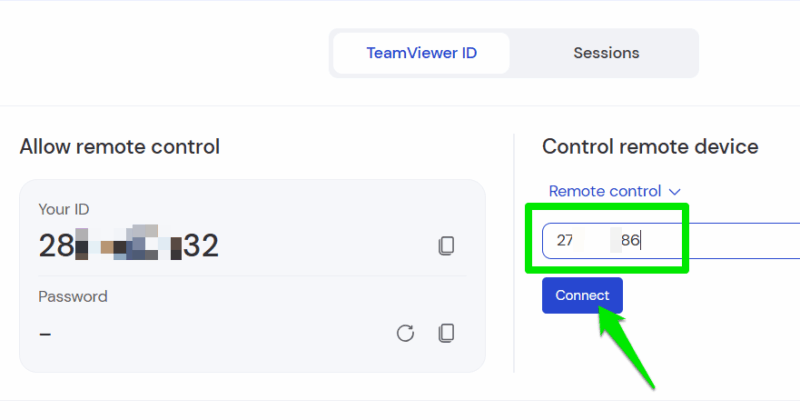
You can use TeamViewer for a free remote session. Just download the TeamViewer app on your laptop and the QuickSupport app on your desktop (both available on the download page).
You’ll need a TeamViewer account on the laptop to create and initiate a session, so create an account and log in. In the main interface, you’ll find a Control remove device section with an empty field below. The QuickSupport app shows an ID and Password; you need to enter that in this empty field to initiate the connection.
The session will run in a separate window, so you can work on your laptop and the desktop at the same time. The big downside to this method is that you’ll notice a slight input delay. It may not be the best for things that require fast reactions, like gaming, but it will be fine for managing files or typing.
Alternatively, you can also use a remote desktop Chrome extension for sessions without signing up.
Using Mouse without Borders is definitely the easiest method if you just want to use your laptop keyboard with your desktop and have control over both. If you are having problems with your laptop keyboard as well, check this guide on fixing laptop keyboard problems.


