
Have you ever found yourself in a situation where you needed to show someone exactly what you’re doing in your terminal? Maybe you’re debugging a server issue with a colleague or demonstrating a complex command sequence to a friend. Sure, you could take screenshots or record your screen, but wouldn’t it be amazing if you could just share your live terminal session through a simple web link? This approach makes collaboration easier and provides real-time visibility into what’s happening on your machine.
Linux already gives you a few ways to share terminals. For example, you have traditional methods like SSH, tools like tmux and screen, and recording tools like asciinema. While these methods work in certain cases, they often add extra steps or dependencies that slow you down.
That’s where the ttyd command-line tool comes in. Instead of forcing others to install software or mess with configs, ttyd turns your terminal into a web page. Now, anyone with the link can open their browser and watch or even interact with your session.
What Can ttyd Do?
- ttyd leverage Libwebsockets and libuv for blazing-fast performance.
- It uses WebSockets under the hood, which keeps the experience smooth and responsive even over weaker connections.
- Supports graphical ZMODEM for file transfers and integrates with lrzsz for dragging and dropping files right in the browser.
- Include SSL/TLS encryption for security, authentication support.
- ttyd can easily run on any port you like, and with cross-compiling compatibility you can even run it on a Raspberry Pi.
- Provide built-in copy/paste support between the browser and terminal.
- Can limit the maximum number of concurrent connections.
- Auto-open sessions in your browser.
- Restrict access to a single client at a time.
Install ttyd on Linux
If you’re on Debian or Ubuntu, ttyd may not be available in the default repositories. But don’t worry, you can still install it easily using other options, such as building from source.
First, make sure your system is up-to-date:
sudo apt update && sudo apt upgrade -yInstall the dependencies required for building ttyd:
sudo apt install -y build-essential cmake git libjson-c-dev libwebsockets-dev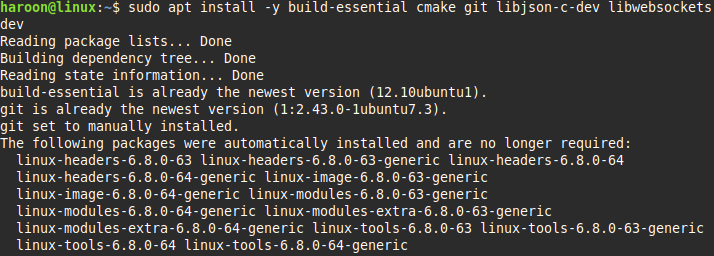
Clone the ttyd source code from GitHub and build it with these commands:
git clone https://github.com/tsl0922/ttyd.git
cd ttyd
mkdir build && cd build
cmake ..
make
sudo make install
And that’s it. You now have ttyd installed.
For other distributions, you can use the same manual build option. Alternatively, you can grab a precompiled binary from ttyd’s GitHub releases page for your architecture (like amd64 for most). Or you can download it with this wget command:
wget https://github.com/tsl0922/ttyd/releases/download/1.7.7/ttyd.x86_64Make it executable:
chmod +x ttyd.x86_64That’s probably the fastest way to get ttyd running on any Linux distro. You can also use a universal package manager like snap to install ttyd:
sudo snap install ttyd --classicOnce you install ttyd using any of these methods, type ttyd --version to confirm it’s installed correctly.
Turn Your Terminal Into a Shareable Web Page
The most basic use of ttyd is to share your default shell session. To do this, simply run ttyd followed by the command you want to share. In this case, it’s bash (or zsh, fish, etc.):
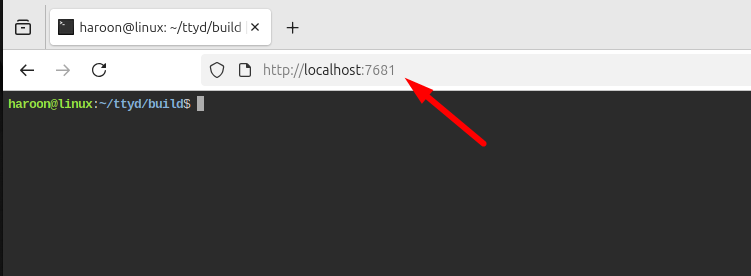
ttyd bashThis command launches a web server on port 7681 by default. To verify, open your browser and visit http://localhost:7681 or http://your-ip-address:7681.
You’ll now see your terminal running inside a web page. In addition, anyone on your network can access this terminal by replacing localhost with your machine’s IP address. You can find your IP with ip addr show or hostname -I, then share it with others.
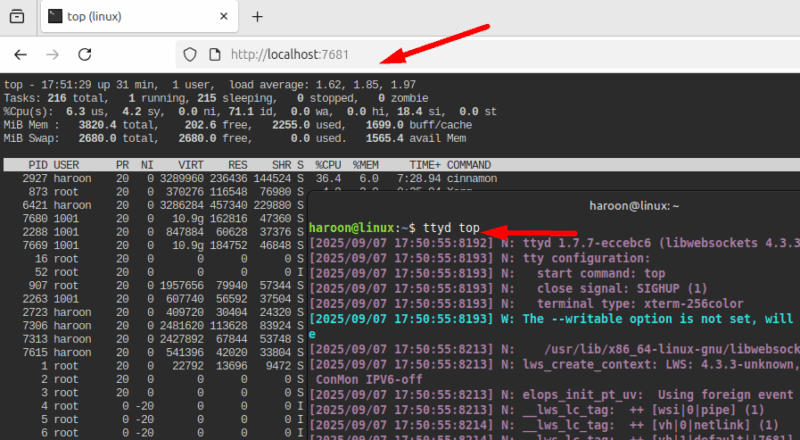
You’re also not limited to sharing a shell. Any command-line program can be exposed in the browser. For example, running ttyd htop will launch directly into the htop process manager, while ttyd vim or ttyd top will share those tools instead.
If you don’t want to use the default port, you can specify your own too. With the -p flag:
ttyd -p 8080 bashNow your terminal is available on port 8080 instead of the default 7681.
Running an open terminal accessible to anyone isn’t a wise option, so ttyd offers authentication options with the -c flag:
ttyd -c username:password bash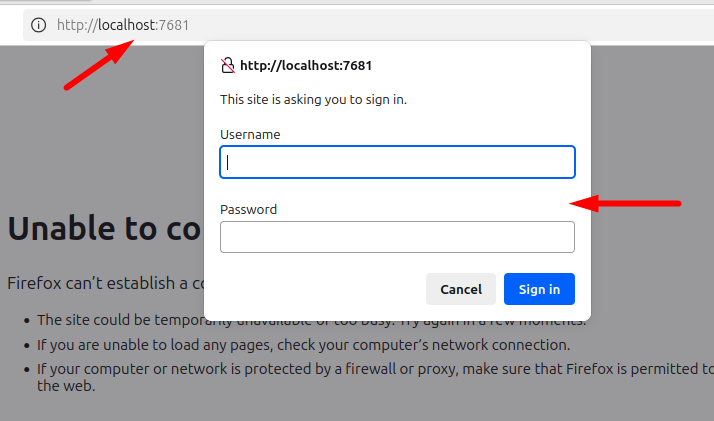
This creates a basic HTTP authentication prompt. Anyone trying to access your terminal must enter the specified credentials. For production environments, you’ll want something more robust, but for quick demonstrations or trusted networks, this works perfectly.
You can also make your session read-only, preventing input from the browser:
ttyd -R bashThis is useful for workshops or presentations where you want to maintain control. On the other hand, use -W if you explicitly want a writable, interactive session.
ttyd -W bashSharing over public network
When sharing over the internet, encryption becomes essential. ttyd lets you enable HTTPS using your own SSL certificate. If you don’t already have certificates, you can create self-signed ones for testing with OpenSSL, although for production, it’s best to use a trusted provider like Let’s Encrypt.
By default, ttyd is only accessible on your local network, but sometimes you’ll want to share it with someone outside your local network. You can achieve this safely in a few ways. The simplest approach is to pair ttyd with a tunneling service such as tailscale or Cloudflare Tunnel, which securely exposes your local port to the internet via a temporary public URL. Alternatively, you can run ttyd on a VPS or cloud server with a domain name, making your terminal permanently accessible through HTTPS.
For more advanced setups, you can bind ttyd to localhost only and place it behind a reverse proxy like nginx or Caddy, which can handle SSL termination, authentication, and fine-grained access control.
Final Thoughts
ttyd takes the complicated task of terminal sharing and makes it as simple as sharing a hyperlink. Furthermore, if you want to learn how to share your Tmux session in Linux, check out this guide.


