
The terminal is good for running tasks, and one of the tasks that I think are faster to do in the terminal instead of the graphical user interface is terminal-based searching. By using several Linux commands, you can easily and quickly find anything without digging through files and folders in a GUI file manager. Let’s explore how you can search in the Linux terminal and find whatever you’re looking for.
Searching Text in Files With grep
If you only learn one search command, make it grep. The name stands for Global Regular Expression Print, and its job is simple: search inside files for specific text patterns. It’s installed by default on most Linux (and macOS) system.
The syntax is simple, you only need to use grep along with your desired search pattern. For example, let’s say you’re trying to find every line that mentions error in a file. You can do that with:
grep "error" fileserver.logIt prints every line that contains the word error. If you want it to ignore case (so it matches Error, ERROR, etc.), just add the -i flag like this:
grep -i "error" fileserver.logIf you’re not sure where the file is, and you want to search through an entire directory, use the -r (recursive) option:
grep -r "TODO"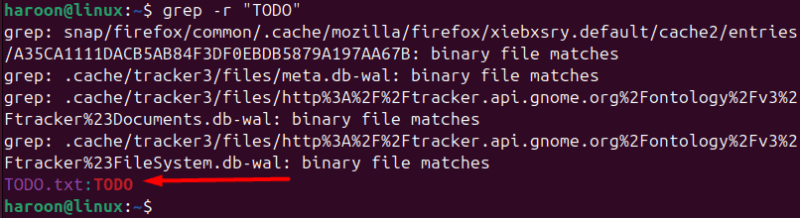
This goes through every file in the current folder and all subfolders, looking for the word “TODO”.
Sometimes you want to see everything except your search term. The -v flag inverts the search, showing only the lines that don’t match. This is fantastic for filtering out noise from log files.
grep -v "DEBUG" app.logThis shows me everything that isn’t a debug message.
Combining grep with other commands
You can also combine grep with other commands. For example, you can pipe (using the | symbol) the output of one command directly into another. This lets you chain commands together. Let’s say you want to see all the SSH processes running on your system. You can list all processes and then pipe that giant list into grep using this:
ps aux | grep "ssh"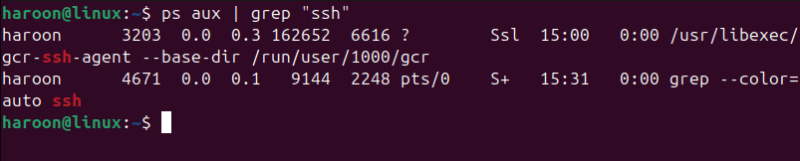
The ps aux command might list 300 processes, but grep filters it down to the one or two you actually care about. You can use this for anything.
grep supports regular expressions too, for more advanced patterns. You can search for things like any line starting with a number, or email addresses or phone numbers in a specific format. For example, to find lines starting with a number, use this:
grep "^[0-9]" file.txtThe learning curve gets steeper here, but the payoff is enormous.
grep vs ripgrep: What’s the Difference and Which One to Use
You already know how useful grep is for searching text inside files, but there’s a faster and more modern alternative called ripgrep (rg). It works almost the same way as grep but provides much better performance and more convenient default settings.
The main difference is speed. While grep processes files sequentially, ripgrep includes optimizations (including multi-threading and skipping irrelevant files) which often make it much faster. On large projects, a search that might take grep 30 seconds can finish in less than one with ripgrep. It’s written in Rust and optimized for handling large directories efficiently.
Unlike grep, ripgrep is not installed by default. You need to install it on your system using your package manager. For example, on Ubuntu/Debian, use this:
sudo apt install ripgrepOnce installed, you’ll use it almost exactly like grep:
rg "TODO"
This command searches all files in the current folder and its subfolders. ripgrep automatically skips hidden files, .git directories, and binary files, so you only see relevant results. It also shows line numbers and colored highlights by default.
In short, both tools do the same job, but ripgrep is faster and more convenient for everyday use, especially when searching large projects. However, grep remains useful when you’re on systems where you can’t install new software or when you need a tool that’s available everywhere by default.
Finding Files and Directories With find
While grep helps you search inside files, the find command helps you locate the files and folders themselves. It’s the tool to use when you know the name or type of what you’re looking for, but not where it’s stored. You can search by name, size, modification time, permissions, file type, pretty much any attribute you can think of.
The basic syntax looks like this:
find /path -name "filename"This command tells find to start searching from the given path and look for files that match the specified name. For example, if you’re trying to track down a missing configuration file, run:
find /etc -name "config.json"By default, -name is case-sensitive. If you’re not sure about the capitalization, switch to -iname for a case-insensitive search:
find . -iname "readme.md"The dot (.) means start in the current directory. find can do far more than just name-based searches. You can filter results based on when files were last modified, which is handy when cleaning up logs or backups. For instance, this command lists all log files changed in the last three days:
find /var/log -name "*.log" -mtime -3The asterisk acts as a wildcard, matching any characters. You can also use it to track down large files that might be filling up your disk space.
Interactive Searching With fzf
fzf stands for fuzzy finder, and it’s basically an interactive search tool for your terminal. It’s a fuzzy filter that you can pipe things into. It gives you a superfast output, as-you-type search bar for any list. You also don’t have to be precise, if you’re looking for “react_component.js”, you can just type rctjs and fzf will understand what you mean.
To use it, you need to install it on your system using your package manager. On Ubuntu/Debian, run this:
sudo apt install fzfOnce installed, the simplest way to use fzf is just by typing:
fzf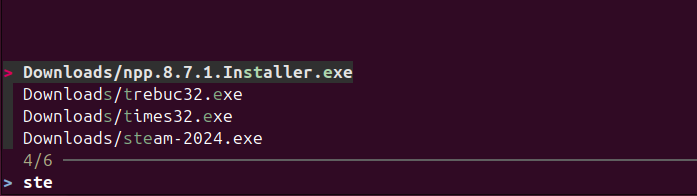
You’ll instantly get a searchable list of files in your current folder. As you type, it filters down results in real time. You can navigate with the arrow keys and hit Enter to select one.
You can also combine it with find. For example:
find . -type f | fzfThat will let you pick a file interactively from the list that find generates.
You can even use it to search your command history:
history | fzfThis lets you interactively search your command history. You can easily find the command you ran three days ago but can’t quite remember. Type a few letters, find it, hit Enter, and it’s ready to run.
Smart File Filtering With ack
ack is similar to grep, but it’s designed specifically for searching through code. It automatically skips irrelevant files (like binaries, logs, or version control folders), which makes it perfect for developers. It’s not available by default, you need to install it on your system. For example, if you’re using Ubuntu, run this:
sudo apt install ackOnce installed, you can use it to search anything. For example, to search for a function definition in Python files, use:
ack --python "def my_function"Want to find every TODO comment across your project? Run:
ack "TODO"You can also use it with common flags, for example, if you need a case-insensitive search with line numbers, run:
ack -i -n "config"In addition, ack already knows about common file types. You can search only in JavaScript files, Python files, or Markdown files using flags like --js or --python.
Back in the day, before ripgrep came along, ack was the go-to tool for developers. Now, ripgrep is faster, but ack still has its charm for readable output and developer-friendly filtering.
Final Thoughts
The Linux terminal can feel intimidating at first, but once you start using these search tools, it becomes part of your daily workflow. Once you’re comfortable with them, you can also create aliases in your shell so you don’t have to remember long commands.


