
Whether you’re explaining a Windows Runtime error to IT guys, capturing video frames, documenting a software workflow, or putting together a how-to, having access to screenshots is essential. There are many ways to take screenshots in Windows, and we’ve gathered several of them for you here.
1. The Print Screen Button
Print Screen, also depicted as PrtScn or PrtScr, is universally available in all Windows keyboards.
Pressing this key might not seem to do anything, but it actually captures your screen and saves it to the clipboard. To view the screenshot, you’ll need to paste it into another program like Paint, Word, or an image upload site in a browser.
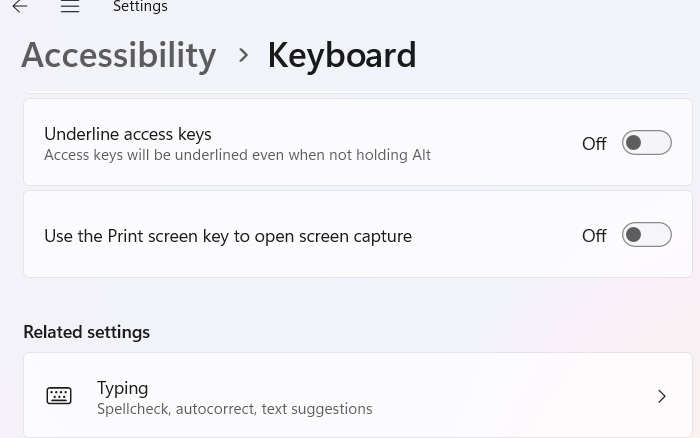
Nowadays, the Print Screen key is synced by default with other screen capture apps in Windows, usually the Snipping Tool. Many users find it annoying. To unlink it, go to Settings -> Accessibility -> Keyboard, and toggle off a menu called Use the Print screen key to open screen capture.
Good to know: is any Windows laptop key not working? We have the fixes.
2. Windows Key + Print Screen (To Save Screenshots)
Saving screenshots to the clipboard is faster, but what if you don’t want to paste them right away into Paint, Word, or another program? That’s when using the Windows + Print Screen shortcut comes in handy as you can access the saved screenshots at your convenience. This will cause your screen to dim momentarily.
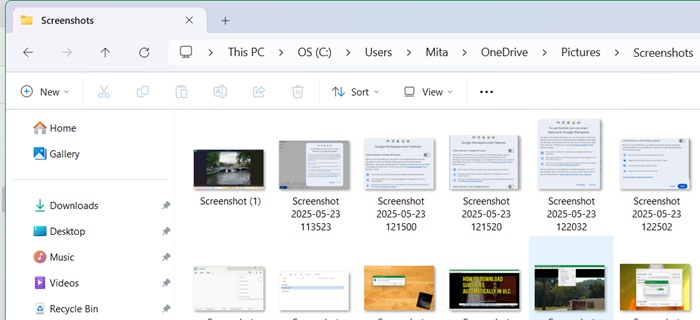
Windows automatically saves these screenshots to a folder called Screenshots inside your Pictures library. You’ll also find captures from the Snipping Tool and other screenshot tools in this folder.
Note: some laptops may require the Fn button to activate the Print Screen button. In this case, you would have to press the Windows, Fn and Print Screen keys simultaneously.
3. Alt + Print Screen (For Active Windows)
Print Screen is a very useful key for taking screenshots, but it has a limitation: it always captures the entire screen at once, which may not be what you need. A related shortcut, Alt + Print Screen, captures only the active window, such as a browser or a pop-up window.
Also read: learn how to capture a scrolling screenshot in Windows devices.
4. Windows Key + Shift + S
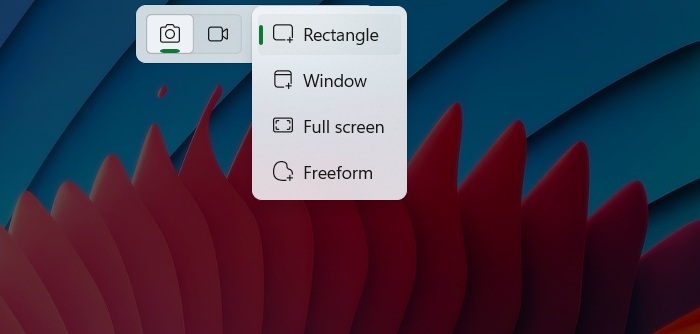
Pressing Windows + Shift + S opens the Snipping Tool overlay on top of your current window. This lets you select a specific area for a screenshot using your mouse. The main capture options include still images and video.
To take a regular screenshot, just click the “camera” icon. You can choose from different capture modes like Rectangular, Freeform, Window, or Full screen. Just tap the close button on the right to turn off this overlay.
Related: find out all the ways to take a full-page screenshot on Windows.
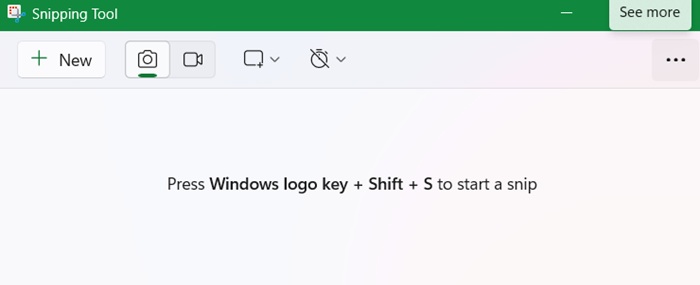
5. Snipping Tool
While keyboard shortcuts are convenient, many users prefer the comfort of a dedicated GUI app for taking screenshots. The Snipping Tool is the default screenshot utility in both Windows 11 and Windows 10. It receives updates with each new Windows version and includes several extra features beyond the basics.
To open the Snipping Tool, you can pin it to the taskbar, search for it in the Start menu, or type snippingtool in the Run dialog using Win + R. To take a screenshot, use the default camera mode and click the + button.
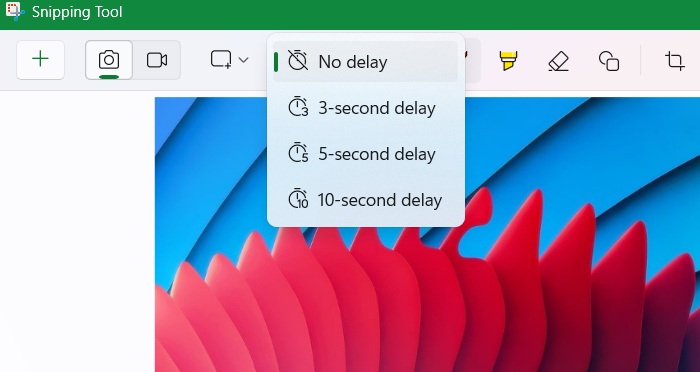
One useful feature of the Snipping Tool is the delay timer, which lets you delay the screenshot by up to 10 seconds.
To adjust settings in the Snipping Tool, click the three-dot See more button on the right. From there, you can choose whether to automatically save screenshots, change the default save location, open captures in separate windows, add borders, or let the Snipping Tool handle the Print Screen key.
Related: you might be able to record your screen as GIF using Snipping Tool.
6. Snip & Sketch
Snip & Sketch is a legacy app that has been discontinued in Windows 11, but is still available in older Windows 10 versions. Although you will not find an official link for the app, if you can access it, its features work very similar to the Snipping Tool. It is particularly useful for adding annotations.

Also read: is your Snipping Tool not working in Windows? We have the fixes.
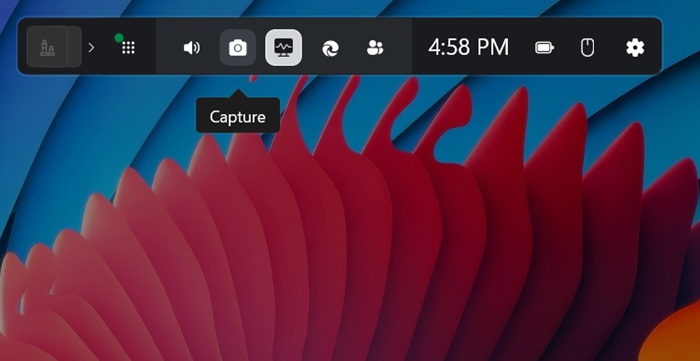
7. The Game Bar
While built for gamers, this commonly used tool is easily accessible to capture screenshots which are saved properly.
Enter Windows + G to open the Game Bar dashboard. There is a camera-like Capture icon to capture any screenshots. You can also capture instances directly using Windows + Alt + Print Screen. All Game Bar captures are saved in the Captures sub-folder of Videos.
The Game Bar scores many advantages over Print Screen and other methods as it supports auto-upload, has a detailed overlay UI, and captures both audio and video. Many users find it convenient not only to capture games but also tutorials, video lessons, or app walkthroughs.
8. Steps Recorder
There is a little known built-in Windows utility that allows you to capture screenshots. It’s called Steps Recorder, which you can access from the search menu as well as from Run command by typing psr.exe. Make sure that Screen Capture mode is enabled in the Settings.
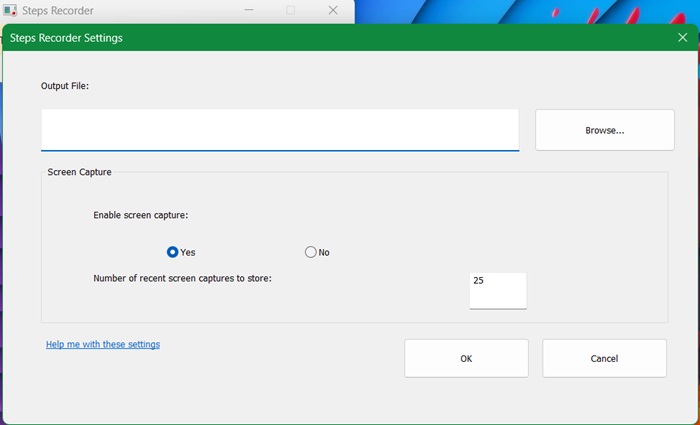
To record anything, click Start Record in the main dashboard. As it appears, this tool is used to capture the various steps of a tutorial.
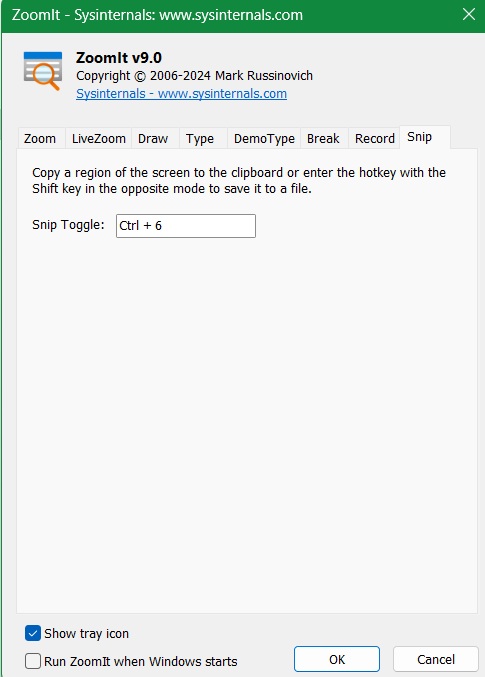
9. Zoomit (Sysinternals)
Although it serves as a screen zooming tool, Zoomit by Sysinternals is a Microsoft utility that also lets you capture screenshots. Download the official ZIP file from the available link and extract the folder. Later, you can use Ctrl + G as a Snip Toggle to capture a specific region into a clipboard.
Related: take a screenshot with a mouse cursor on Windows.
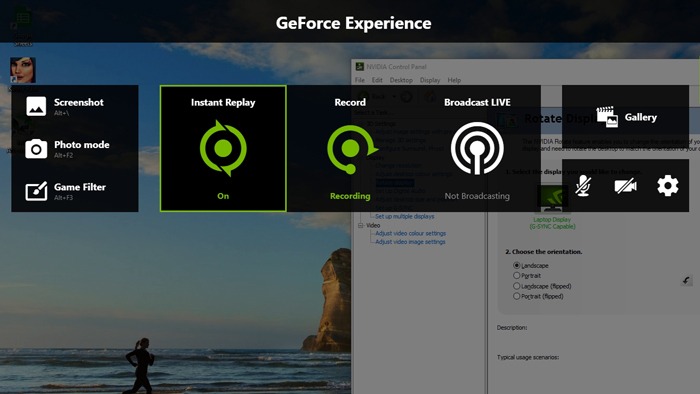
10. Use Your Graphics Card Software (Nvidia or AMD)
Screenshots can sometimes be a complicated thing. Depending on what app or game you’re running, it’s possible that you’ll be locked out of the default Windows shortcuts to take screenshots. In those situations, it’s good to have a backup. If you are using an Nvidia or AMD graphics card, then you have one.
Nvidia GPU owners with GeForce Experience enabled should be able to take a screenshot by hitting Alt + F1. (You can change the hotkey through the GeForce Experience overlay, which you can open by hitting Alt + Z.)
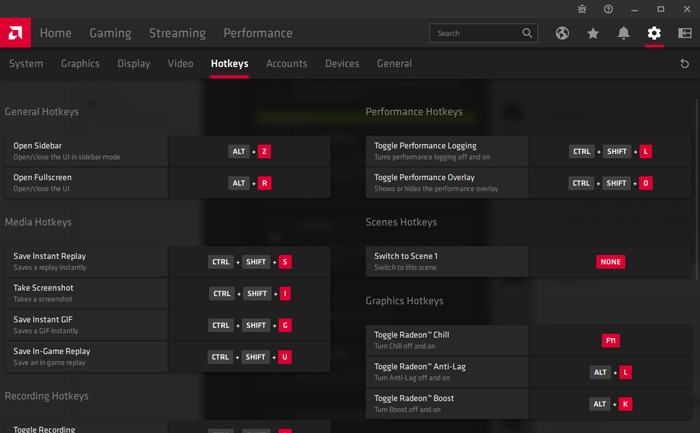
AMD GPU owners, meanwhile, can take screenshots using Ctrl + Shift + I, but again, you can change this hotkey to one of your choice through Radeon Software under Settings -> Hotkeys.
Related: Greenshot is a good external screen capture tool.
11. External Screenshot Capture Tools in Windows
Of course, you can use various external screenshot/screen grabbing tools in Windows. The most popular ones are Screenshot HD, Screenshot Easy, and Real Screenshot for Webpage.
There are many specific screenshot capture modes you may require. For example, did you know that it is possible to capture a screenshot of the Windows login screen. You should also take a look at our guide on converting VCE files to PDFs.


