Google Play Services is a core Android component, responsible for syncing data, notifications, and many other behind-the-scenes tasks. But if it malfunctions, it can quietly become a major battery drain. We’ve put together a list of solutions that should help you fix the battery issue you’re experiencing on your Android device.
Good to know: in case you don’t have the app installed, learn how to get Google Play Services on your phone.
Check If Google Play Services Is Causing Battery Drain on Android
Here’s how you can see if Google Play Services is the culprit behind the battery drain on your Android device.
Note: Google Play Services doesn’t directly drain your battery, but its usage may spike when other apps are using it.
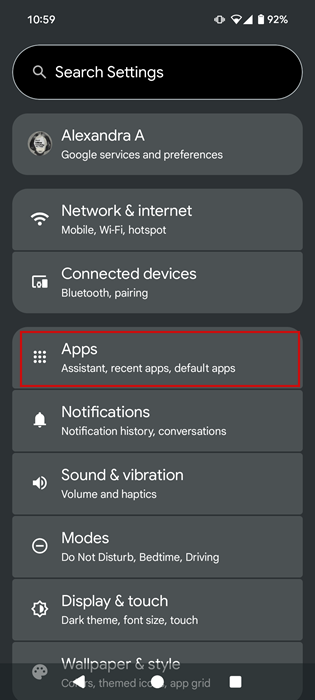
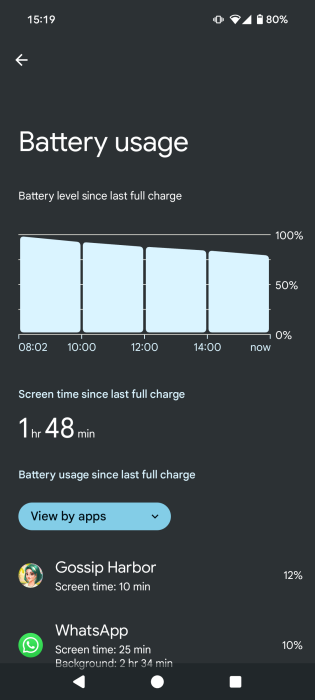
On your phone, go to Settings -> Apps. Depending on your phone model, it might be Apps & notifications or something similar. Tap See all apps.
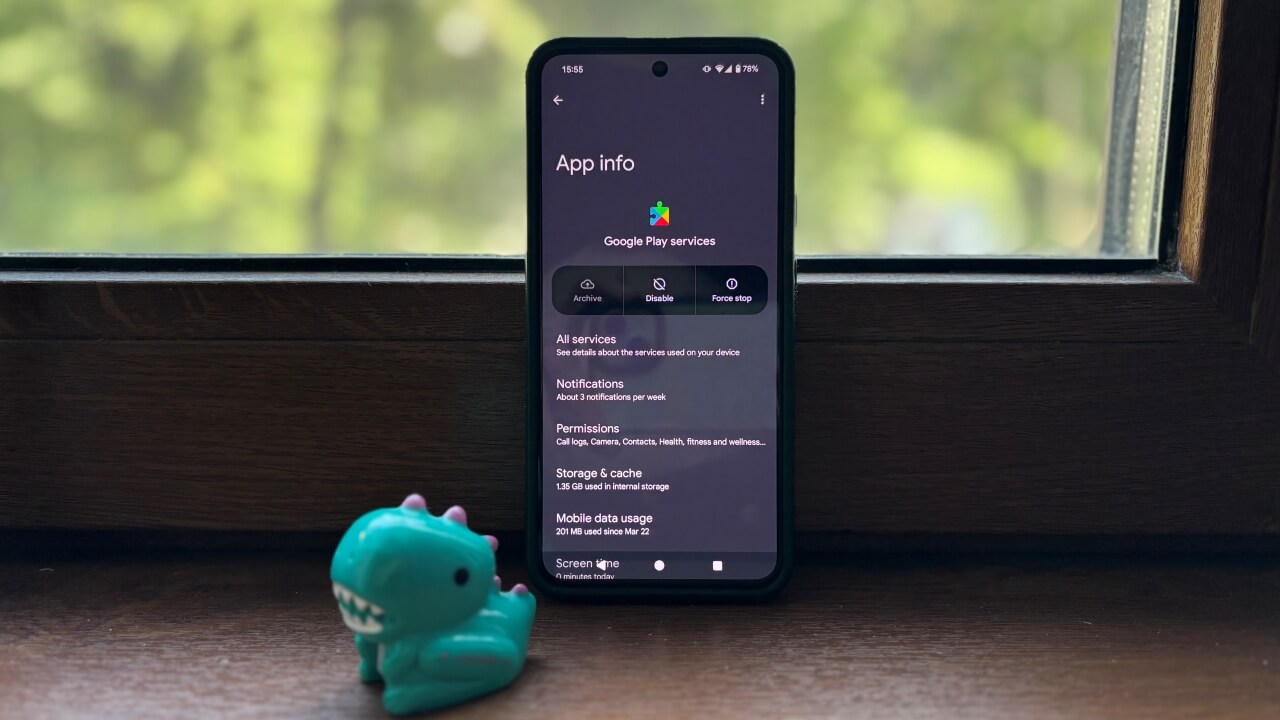
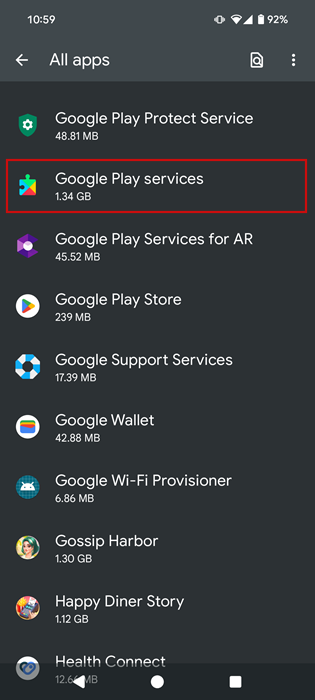
Scroll down to Google Play services in the app list and tap it.
Find the App battery usage option and see what it says underneath.

What percentage of the battery has been used since the last full charge? If it’s using more than a few percent of your battery (i.e., if it’s going into double digits), that’s too high, and you need to address the problem. Ideally, it should say “No battery use since last full charge.”
Alternatively, go to Settings -> Battery -> Battery usage and check out the apps consuming most of your battery. See if Google Play Services is among them.
1. Delete Apps That You Don’t Use Regularly
Since Google Play Services isn’t the actual culprit here, but the other apps communicating with Google Play Services and their features, such as location access, Wi-Fi, data, or running in the background, it’s important to assess whether you’re constantly using the apps that are shown to be consuming the most.
If you’re not sure whether you can trust the battery stats provided by your phone, there’s also the option to consult a third-party app like AccuBattery that is designed to display accurate battery usage information. Take note of the apps that appear in the list, as they are the most power-hungry on your device.
Now, if apps you rarely use that are among the top battery consumers, you should consider removing them from your device altogether. You can install them back again after some time passes and the issue hasn’t manifested itself again.
Tip: check how you can auto connect Android to the correct network and Bluetooth device.
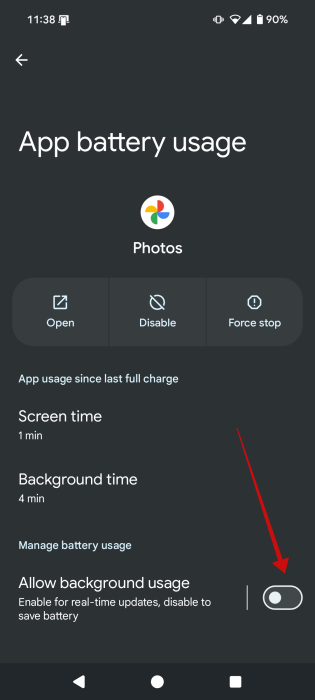
2. Check Background Restrictions
Go through the remaining apps on your phone and disable the background activities for those that aren’t essential to your daily routines.
Navigate to Settings -> Battery -> Battery usage and select an app.
On the app screen, toggle off Allow background usage at the bottom.
3. Clear Cache and Data
A simple thing to try is to clear the Google Play Services cache, which may have become bloated with excess unnecessary information, causing the strain.
Go to Settings -> Apps -> See all apps -> Google Play Services.
Find the Storage & cache option and press on it.
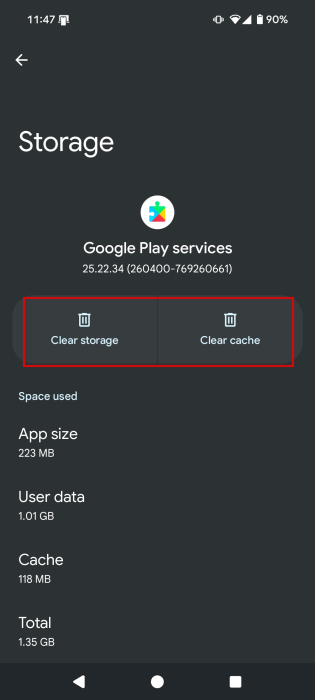
Tap on the Clear cache button at the top.
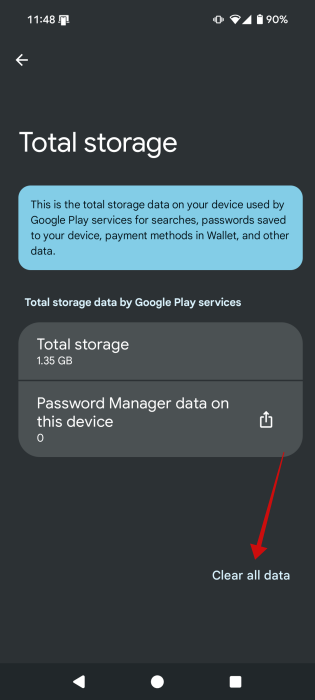
If you’re still suffering from battery drain, the more radical step is to Clear storage for Google Play services. Tap the Clear all data button on the next screen to finish the process.
4. Turn Off Auto-Sync
If you have more than one account connected to Google Play Services, that could explain the battery drain issue. Since Google Play Services constantly checks for new emails, notifications, does app security scans, and more, it’s continuously running in the background. Therefore, that’s even more memory.
Tip: go to Settings -> Apps -> Google Play Services -> All services to check the full extent of all Google Play Services does on your phone.
You can fix this by turning off auto-sync for various accounts, such as your email as well as third-party apps like WhatsApp. Your Google account, in particular, manages syncing for many apps.
Go to Settings -> Passwords, passkeys & accounts, then tap each account to see whether syncing is switched on or off. Depending on your phone model, the section you need to be looking for might be just Accounts. Tap on a certain account.
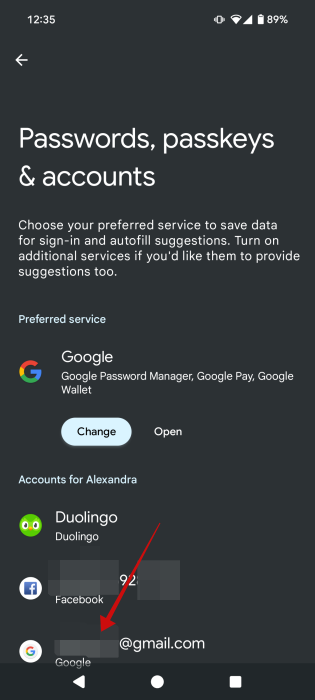
For Google accounts, you should see the Account sync which is activate by default. Press it.
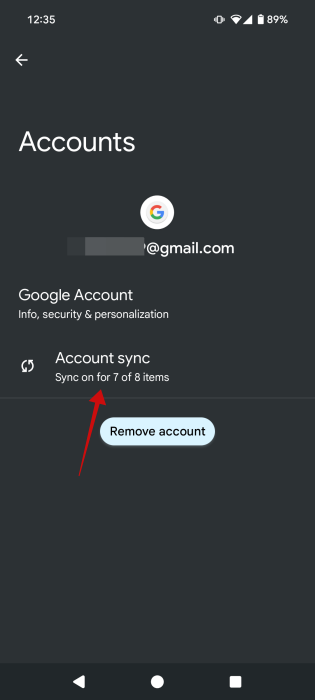
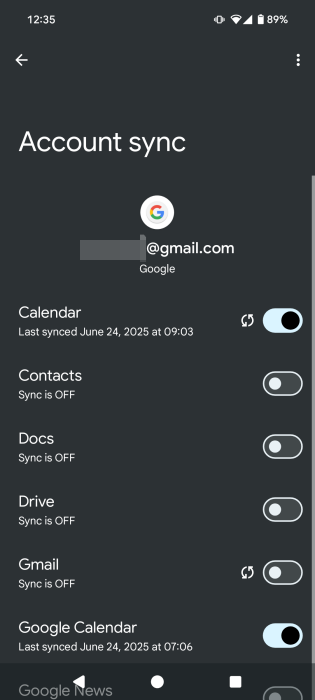
Disable all the services that you don’t want to sync on this account. For instance, you can disable Gmail sync for a Google account you don’t really use that much, and you just keep as a backup.
5. Resolve for Any Sync Errors
Whenever Google Play Services tries to sync data but can’t, you get sync errors. These errors can also be the reason you have to charge your phone more than before. Take a look at your contacts, calendar, and Gmail account to see if you can spot any errors. Try removing any emojis you may have on any contacts, as Google doesn’t like that.
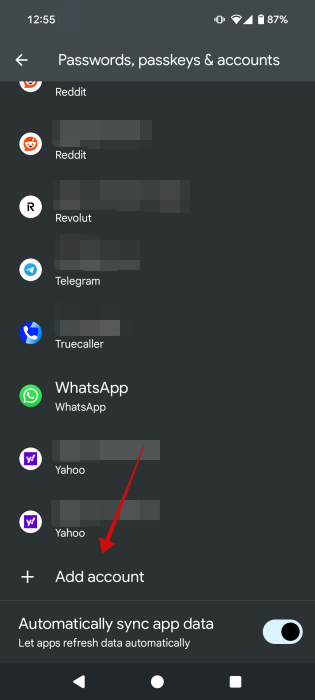
You can also try removing and re-adding accounts to try and fix those sync errors. To do that, proceed to go to Settings -> Passwords, passkeys & accounts -> Add account (the option is all the way at the bottom).
Turning off mobile data in your device’s settings for a little more than a minute can also help, but remember to turn it back on.
Tip: here’s how to get AI summaries in your Gmail inbox.
6. Turn Off Location Syncing
There are plenty of apps that will ask for your location. The issue is that when they do, the request goes through Google Play Services, which then uses your GPS to relay that information. As a result, you may want to turn off location sharing for certain apps.
Open an app that’s asking for your location on your phone.
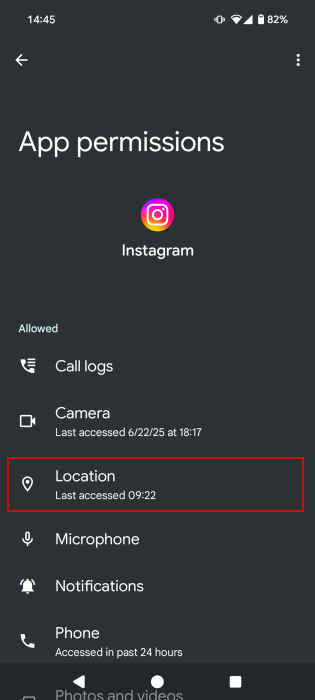
Then head to Settings -> Apps and find the app in question. Select Permissions.
Tap on Location from the list of app permissions.
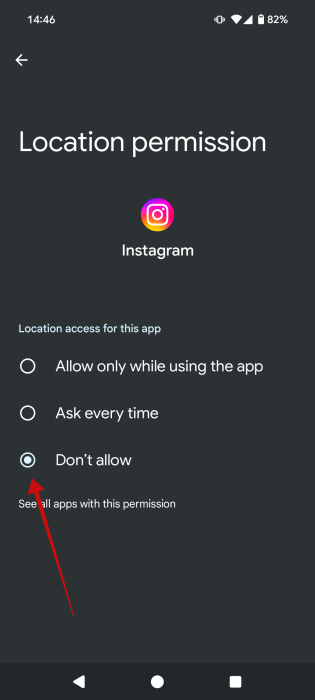
Switch the option to Don’t allow to help you cut down on Play Services’ battery use.
7. Uninstall Google Play Services Updates
This may sound a little strange, but sometimes updates will cause a bug. For this reason, if you’re experiencing battery drain because of Google Play Services, you can try uninstalling the updates to this service.
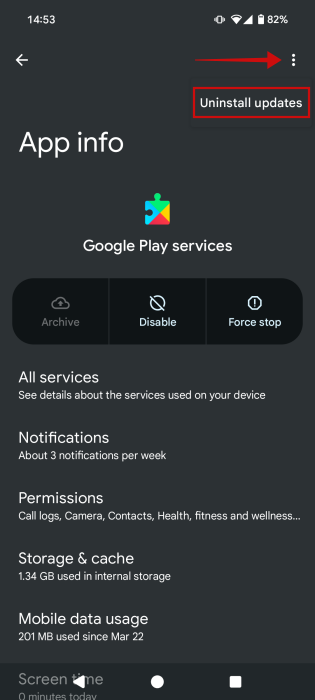
Go to Settings -> Apps -> Google Play Services.
Tap the three dots at the top-right corner. Select Uninstall updates.
Reboot your phone to see if that makes a difference.
Tip: check these Chrome extension that can improve your Google Calendar.
8. Install an Older Version of Google Play Services
On occasion, the latest version of Google Play Services may contain bugs. If you’re witnessing increased battery drain after updating Google Play Services, you may need to roll back to a previous version of Google Play Services (at least until the latest version gets patched up).
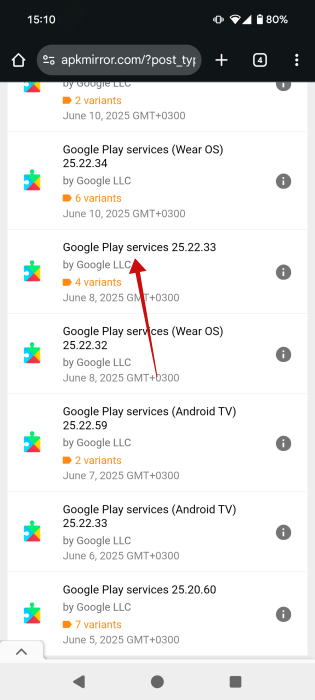
Go through the tip above to uninstall updates, then go to APK Mirror and search for Google Play Services. Alternatively, use any of these sites that are safe for downloading APKs.
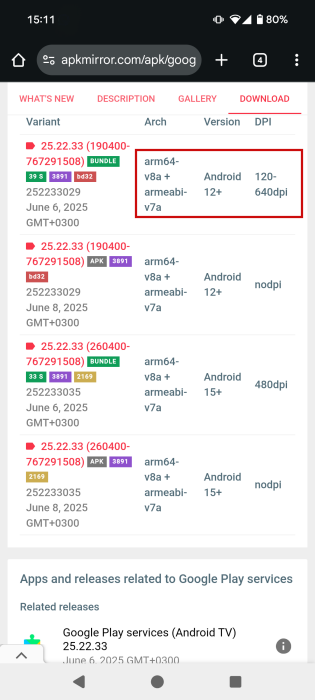
Scroll down and tap a version of Services that’s one or two versions before the latest one (ignore the beta versions). Also, make sure you select a standard Google Play Service option and not Google Play Services for Android TV, AR, etc.
You’ll see that there are dozens of variants to choose from. To download the right variant, you need to know three things: the architecture of your phone’s SoC, the DPI of your phone’s screen, and your Android version.
You can find your Android version by going to Settings -> About phone.
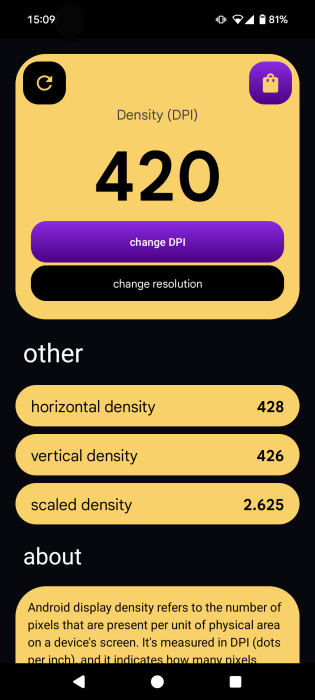
As for the DPI of your phone screen, you’ll need to download a third-party app like DPI Checker.
Knowing these two details should be enough for you to pick the correct version, but if you want to make sure you’re selecting the right one, open Google on your phone and type “[phone model] specs” and check whether your SoC is a 64-bit (arm64) or 32-bit (armeabi). However, most APK versions are compatible with both.
Tip: in case you’re unsure how to install and APK on your Android, follow the steps in our tutorial.
9. Update Your Android OS
Finally, you might want to make sure that you’ve updated to the latest available version of Android for your device. You should receive a notification on your device when a software update is available on your phone, but you can also check manually by going to Settings -> System -> System updates.
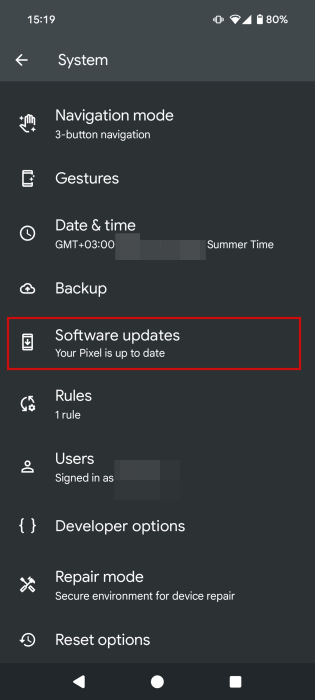
If an update is available, install it. It might contain a bug fix for Google Play Services.
Bonus: Turn on Battery Saver
If your battery life still isn’t up to par, you may need to enable your phone’s built-in Battery Saver option (if it has one) and see whether that helps.
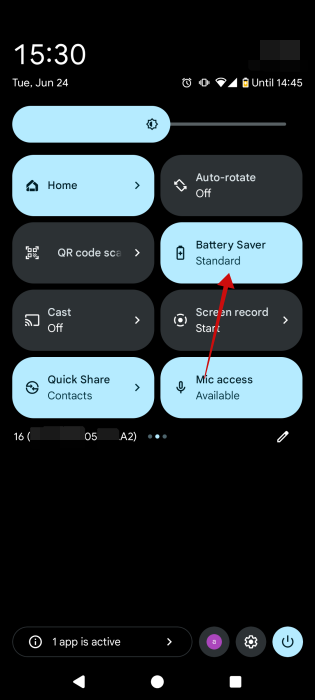
On our Pixel device, there’s a Battery Saver tile in the Quick Settings menu, which we could easily enable by taping it.
Frequently Asked Questions
How do I update Google Play Services?
Check for updates to Google Play Services by going to Settings -> Apps -> Google Play Services -> App details. Next, press the Update button if available.
Can using Google Play Services beta contribute to battery drainage?
Yes. Therefore it might not be a good idea to enroll as a beta tester for Google Play Services if you want to avoid battery drainage issues, as beta builds usually contain bugs of all types and are known to be unstable.
Can I delete Google Play Services?
You can on a rooted phone. Please note, however, that deleting the app will cause you to lose access to most Google privileges, like access to the Play Store, Google Maps, and basically all Google apps as well as many third-party ones. That saids, it’s a big commitment – even a lifestyle choice – and not something to be taken lightly. On a non-rooted phone, the best you can do is disable the app.