
When I first started using Docker, my biggest mistakes weren’t about commands or configuration. They were decisions that later caused security issues, bloated images, and hours of debugging. At that time, my only goal was to get containers running. I didn’t think about best practices or how those early choices would affect performance and security in the long run.
With experience, I realized that Docker is more than a packaging tool; it’s a workflow that needs careful planning. While containerization ensures consistent environments and makes deployment easier, it also introduces challenges like security gaps, networking problems, and even conflicts with VPNs.
In this article, I’ll share the biggest mistakes I made with Docker and how fixing them boosted my productivity.
Choosing the Wrong Base Image
One of the biggest lessons I learned early on was that the base image you choose affects everything, pulling, building, deploying, scanning, and even debugging. In the beginning, I used full OS images like “ubuntu:latest” simply because they felt familiar. But those large images came with hidden costs: slower builds, heavier deployments, and oversized final containers.
When I shifted to minimal and purpose-built images such as “Alpine”, “Slim”, or official language-specific images, the difference was immediate. My images became smaller, builds finished quicker, and security scans showed fewer vulnerabilities.
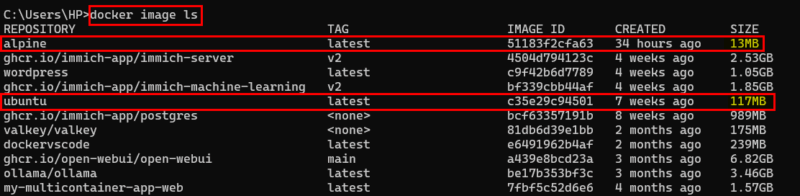
Of course, minimal images aren’t always the right choice; some projects genuinely need the libraries that come with Ubuntu or Debian. The real productivity boost comes from choosing your base image intentionally, not out of habit. Pick the image that fits your project’s actual needs, and you’ll feel the improvement across your entire workflow.
Hardcoding Secrets and Credentials
Hardcoding configuration values was one of the biggest mistakes I made early on. I used to place things like database URLs and API keys directly inside the Dockerfile because it felt convenient.
But doing that meant those secrets were stored inside the image and eventually ended up in version control. Anyone with access to the image or the repository could see them, which is a serious security problem.
A safer way is to keep the Dockerfile free of sensitive information and pass the actual secret values only when the container runs. For example, instead of writing real values inside the Dockerfile, you set empty environment variables.
# Keep Dockerfile clean
ENV DATABASE_URL=""
ENV API_KEY=""
Then you provide the real values at runtime like this.
docker run -e DATABASE_URL="postgres://user:pass@localhost:5432/appdb" -e API_KEY="my_real_key_here" myappThis keeps secrets outside the image, avoids pushing sensitive data to Git, and makes it easy to update values without rebuilding anything.
Using the latest Tag Instead of Specific Versions
Using the latest tag looks easy, but it often leads to unpredictable builds. The same Dockerfile can behave differently from one day to another because the base image quietly changes in the background. For example, writing FROM node:latest might work today, but tomorrow Docker could pull a newer Node version, and your build could fail without any changes on your side.
Things became much smoother when I started using specific versions like this.
FROM node:20
FROM python:3.10
This ensures stable builds, makes debugging easier, and prevents surprise issues caused by hidden updates. It also saves time because you always know exactly which environment your app is running on.
Missing or Misconfigured .dockerignore
One mistake I made early on was not using a .dockerignore file. By default, Docker includes your entire project folder in the build context, everything from “node_modules” and “.git” to temporary files and even large datasets you forgot about. This can make builds slow and images unnecessarily big.
To avoid such situations, create a “.dockerignore” file and tell Docker what not to include. It is recommended to always ignore folders like “.git”, “node_modules”, logs, caches, and temporary files.
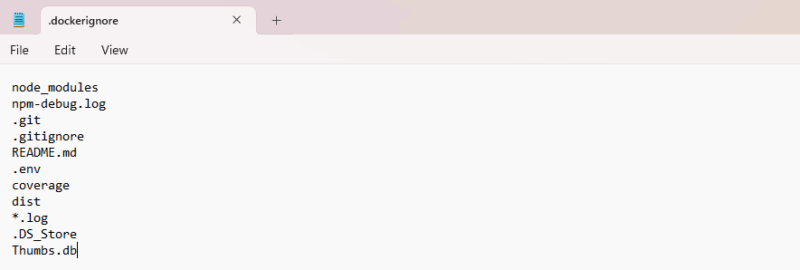
It’s a small step that makes a big difference.
Inefficient Layer Ordering
Another mistake worth avoiding is arranging your Dockerfile instructions in the wrong order. Docker creates a new layer for each instruction. If an early layer changes, everything after it is rebuilt. In the past, I wrote Dockerfiles like this.
# Poor layering. Any code change forces a full rebuild
FROM node:18-alpine
WORKDIR /app
COPY . .
RUN npm install
CMD ["npm", "start"]
Here, the COPY .. is placed too early. Even if I changed a single JavaScript file, Docker had to reinstall all dependencies because the cache was invalidated. This made my builds unnecessarily slow.
A better approach is to separate dependencies from application code so Docker can cache them properly.
# Improved layering. Dependencies are cached separately
FROM node:18-alpine
WORKDIR /app
# Copy only the dependency files first
COPY package*.json ./
RUN npm install
# Copy the rest of the application afterward
COPY . .
CMD ["npm", "start"]
To optimize even further, you can group instructions based on how often they change.
# System packages (hardly ever change)
RUN apk add --no-cache git bash
# App dependencies (usually change monthly)
COPY package*.json ./
RUN npm ci --only=production
# Application source code (changes frequently)
COPY . .
By placing the most stable layers first and the frequently changing layers last, Docker can reuse cached steps.
Packing Everything into a Single Stage
When I first started using Docker, I didn’t realize how much weight I add to my images by putting everything: development tools, compilers, test runners, and build artifacts, into a single Dockerfile. I shipped images that were huge, slow to pull, and definitely not production-friendly. Most of that stuff was never meant to end up in production, yet it stayed there simply because I built everything in one stage.
Once I learned how multi-stage builds work, things changed instantly. I could run all the heavy steps in one stage and then create a clean, minimal final image that contained only what the app needed to run. This made my images faster to deploy, more secure, and far smaller.
Running Containers as Root
In the beginning, I didn’t think much about which user my container was running as. Docker defaults to root, so I just went with it. Later, I realized this was a serious mistake. Running as root gives a container far more control than most applications ever need, and one small misconfiguration can expose your system to unnecessary risks.
For example, the following output shows that the container is running as the root user, which means it has superuser privileges. It can modify sensitive system areas, access system devices, and even interact with hardware-level groups, which is a serious security risk for any production environment.

Once I understood this, I switched to creating a dedicated user inside the image and running the app through that user instead of root.
# Create a safer user and group for the app
RUN addgroup -S webgroup && adduser -S webuser -G webgroup
# Copy project files and assign correct ownership
COPY --chown=webuser:webgroup . /app
# Run the container as the non-root user
USER webuser
This way, using a non-root user makes the container safer, reduces privilege risks, and follows best security practices, without adding complexity.
Not Setting Resource Limits
Without limits, containers can consume all system resources, slowing down or crashing your host. I experienced this during a heavy build; one runaway container brought everything to a halt.
To avoid this, always set resource limits so your containers stay within safe boundaries. You can do this using flags like --memory, --cpus, and --memory-swap when starting a container. For example, the following command limits the container to 500 MB of RAM and allows it to use only one CPU core.
docker run --name my-app --memory="500m" --cpus="1.0" node:18-alpineOverusing Privileged Mode
When I first ran into issues with Docker containers, I thought using --privileged was a quick fix. It felt like magic, suddenly everything worked!
docker run --privileged my-containerBut I quickly realized this gives the container almost unlimited access to the host system. That’s a huge security risk. Many times, all I needed was a small capability like SYS_ADMIN, not full privileged access.
docker run --cap-add=SYS_ADMIN my-containerUsing --privileged was overkill. Therefore, granting only the necessary permissions keeps the host safer while still allowing the container to function properly.
So, plan your Docker setup carefully from the start. By avoiding these common mistakes, your containers will be safer, faster, and much easier to maintain, letting you focus on building and deploying great applications instead of constantly fixing issues.


