
High FPS and stable Internet are easy to come by, but the real competitive edge comes from tweaks that cut those extra milliseconds of latency. In esports, or in certain games, those shaved milliseconds can make a lot of difference. Here we show you some Windows Registry hacks that will help and give you the edge you need to dominate.
Warning: incorrect changes in the registry can cause system instability and possible data loss. Make sure you back up the Windows Registry before applying any of the tweaks.
How to Access Windows Registry
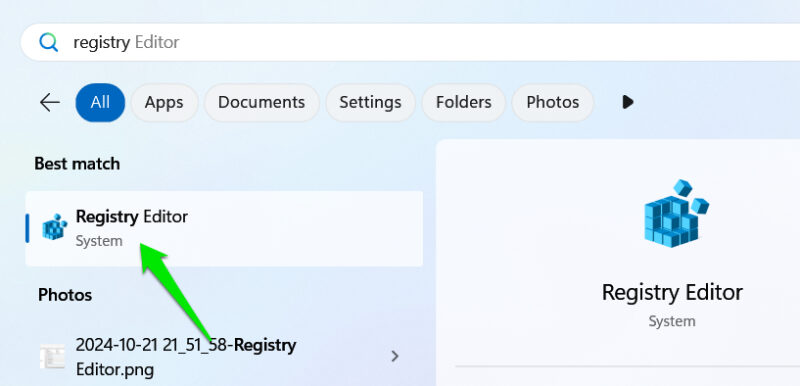
There are many ways to open the Windows Registry Editor, but the easiest way is to search for “registry” in Windows Search and click on Registry Editor. Alternatively, you can press Win + R, and type regedit in the Run dialog to open it.
We are providing the exact location path for the hacks. You can copy/paste the location in the path bar at the top, or manually reach each key by double-clicking on the parent keys.
Disable CPU Core Parking
By default, Windows saves power by disabling some of the CPU cores when they are not in use. Although it’s a really handy feature that doesn’t impact performance much in general use, it does add some latency in high CPU usage tasks. In games, it can occasionally cause slight stutters or input latency, which can be bad for fast-paced games.
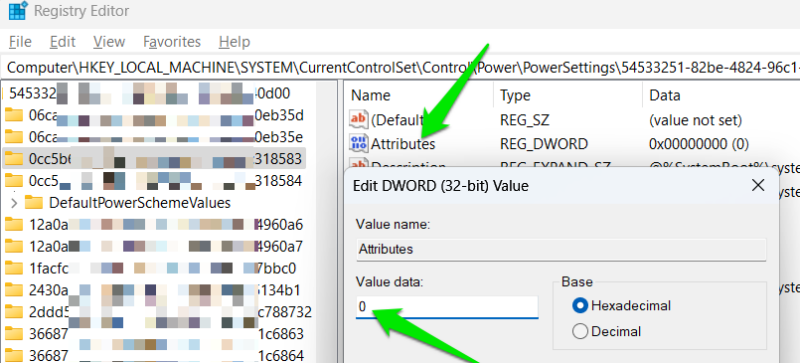
To disable it, go to the following key, and select it.
HKEY_LOCAL_MACHINE\SYSTEM\CurrentControlSet\Control\Power\PowerSettings\54533251-82be-4824-96c1-47b60b740d00\0cc5b647-c1df-4637-891a-dec35c318583In the right panel, double-click on Attributes, and set its value to 0.
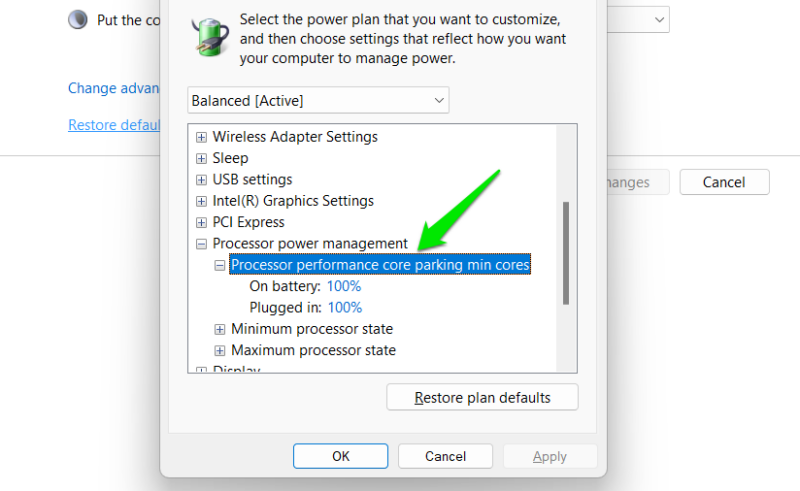
To confirm the change, search for “edit power plan” in Windows Search, then go to the plan’s advanced option.
A new Processor performance core parking min cores entry under the Processor power management is set to 100%, which means core parking is disabled. You can adjust the percentage, but it’s best to keep it at 100% for maximum gains.
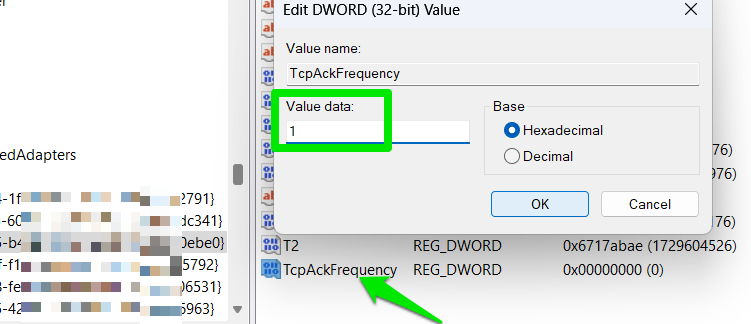
Increase TCP ACK (Acknowledgement) Frequency
TCP (Transmission Control Protocol) manages data transmission by sending packets and ensuring they arrive at the destination in the correct order. This involves an ACK (Acknowledgement) step, where the recipient confirms that the packet has been received correctly. By default, Windows waits for packets and sends ACKs for multiple packets at the same time, decreasing network overhead but introducing latency.
Since we want the lowest latency for competitive gaming, you can increase the ACK frequency. However, you need to know your network adaptor’s GUID first before following the Registry hack.
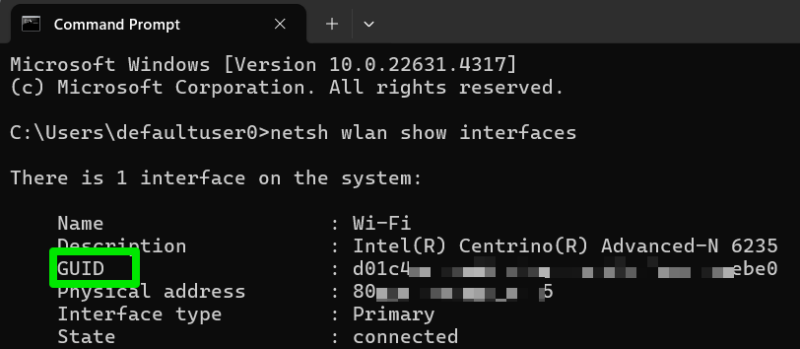
Search “cmd” in Windows Search, and open the Command Prompt. Enter netsh lan show interfaces for a wired connection or netsh wlan show interfaces for a wireless connection. Take note of the GUID.
Move to the following location in the Registry:
HKEY_LOCAL_MACHINE\SYSTEM\CurrentControlSet\Services\Tcpip\Parameters\InterfacesUnder Interfaces, select the key with the same name as your network GUID noted above, then right-click on a space in the right panel, and select New -> DWORD (32-bit) Value.

Name it TcpAckFrequency, double-click on it to open it, and set its value to 1 to force Windows to send an acknowledgement for every packet received.
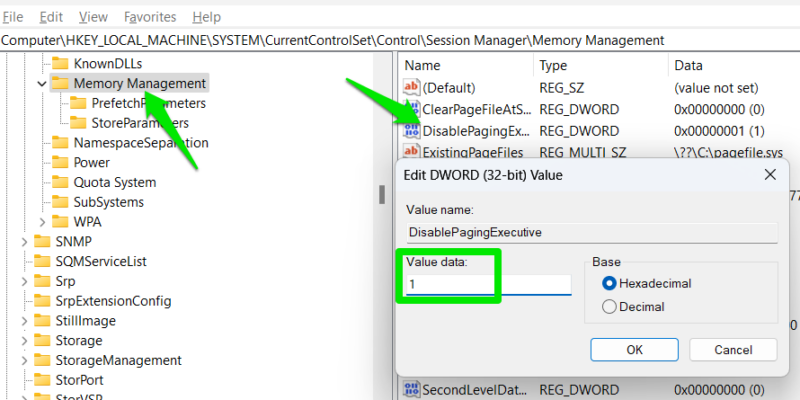
Reduce Deferred Procedure Call (DPC) Latency
Windows uses a Deferred Procedure Call (DPC) to manage high-priority tasks and delay low-priority tasks. This delay can introduce input lag when gaming and cause audio interference as well. Although you can’t remove DPC latency, you can decrease it by forcing the kernel to keep pageable data in physical RAM instead of the pagefile.
Move to the following location in the Registry:
HKEY_LOCAL_MACHINE\SYSTEM\CurrentControlSet\Control\Session Manager\Memory ManagementDouble-click DisablePagingExecutive in the right panel, and set its value to 1.
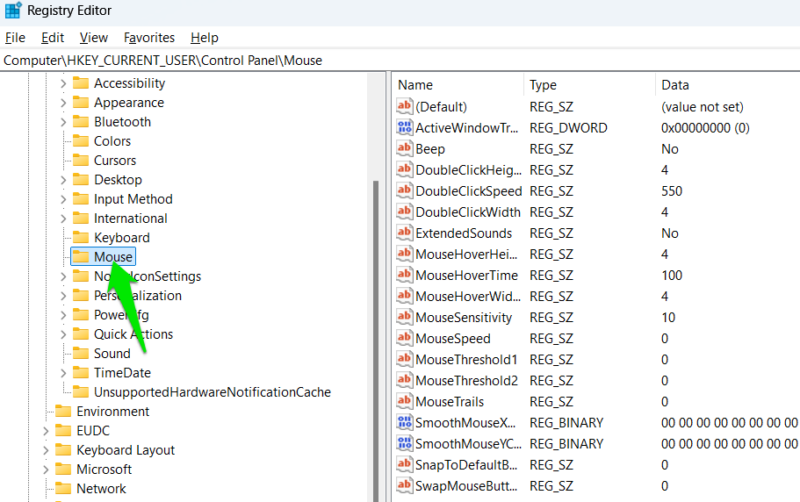
Tweak Mouse Settings More Precisely
You can adjust mouse settings from Windows settings, but in the Registry, you can have more granular control over each option. For example, you can select exact mouse acceleration thresholds or adjust double-click speed in milliseconds.
In the Registry, go to the following location:
HKEY_CURRENT_USER\Control Panel\MouseYou’ll find multiple mouse settings that you can fine-tune. The following settings can provide a competitive edge when configured:
- DoubleClickSpeed: to avoid accidental double-clicks or ensure double-clicks are always registered.
- MouseThreshold: helps adjust the exact sensitivity when mouse acceleration kicks in.
- MouseSpeed: decides the speed of mouse acceleration.
- MouseHoverTime: adjust how fast tooltips and hover information show up.
- DoubleClickHeight/Width: adjust how much the mouse is allowed to move during double-clicking. You can adjust it to increase double-click precision.
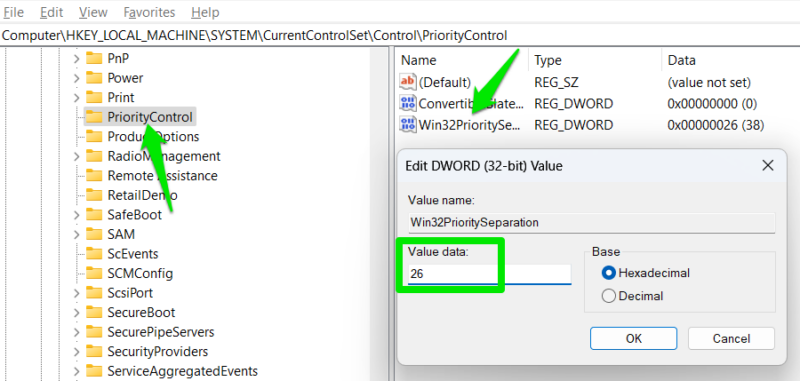
Increase the CPU Priority of a Game
Although there are many ways to manage CPU usage priority, the Win32PrioritySeparation Registry key offers more granular control over priority and latency. You can adjust process latency, resolution time, and foreground process priority. Of course, our focus is on getting a competitive edge in gaming, so we’ll modify it for the lowest latency and best performance.
Go to this location in the Windows Registry:
HKEY_LOCAL_MACHINE\SYSTEM\CurrentControlSet\Control\PriorityControlDouble-click on Win32PrioritySeparation, and set its value to 26 to ensure the lowest latency, faster information processing, and highest CPU priority for the game when it’s in focus. If you notice any stability issues – like micro stutters – try setting the value to 2A instead.
Disable Full-Screen Optimizations System-Wide
By default, Windows runs full-screen apps in a hybrid mode, where it runs full-screen but can still access window mode features, like overlays or quick access to desktop/apps. However, this optimization also causes slight input lag and sometimes performance issues, such as stutters.
If you don’t use any game overlays or multitask while playing games, disabling full-screen optimizations can give you a slight competitive edge. Although it can be individually disabled for apps, you can use the Registry to disable it system-wide.
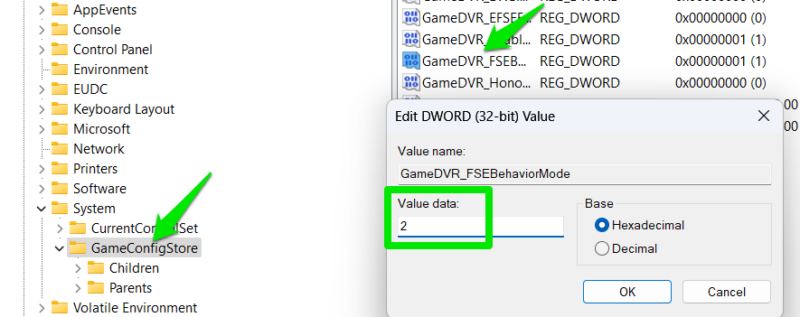
Move to the following location:
HKEY_CURRENT_USER\System\GameConfigStoreOpen GameDVR_FSEBehaviorMode in the right panel and set its value to 2. If you face issues with any of the games after disabling it, you can enable this function just for that game by going to its Properties -> Compatibility.
Disable Power Throttling
Windows throttles the power of background processes to save power. Although it doesn’t impact your games when you are playing them, it can still cause trouble if your game opens more than one process. This function can throttle the game’s secondary processes, which can indirectly impact the whole game.
You can completely disable power throttling to ensure nothing interrupts your gameplay using the Registry.
Access the below-mentioned location in the Registry:
HKEY_LOCAL_MACHINE\SYSTEM\CurrentControlSet\Control\Power\PowerThrottlingCreate a DWORD value in the right panel by right-clicking and selecting New -> DWORD (32-bit) Value. Name this value PowerThrottlingOff and set its value to 1. You’ll have to restart the PC for the changes to take effect.
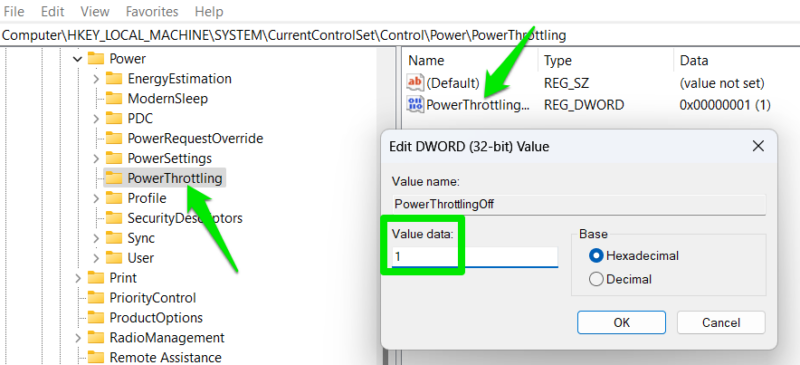
Be careful when tweaking this on a laptop, as this will increase power draw and impact overall laptop battery life.
Free Up More CPU Resources For Games
By default, Windows reserves 20% of CPU resources for background tasks. You can decrease and even remove this value to free up all CPU resources for the foreground programs (i.e., games). This will help you in CPU-intensive games by helping avoid stutters and jitters. Of course, changing it will also impact background apps, but when gaming is a priority, it’s worth it.
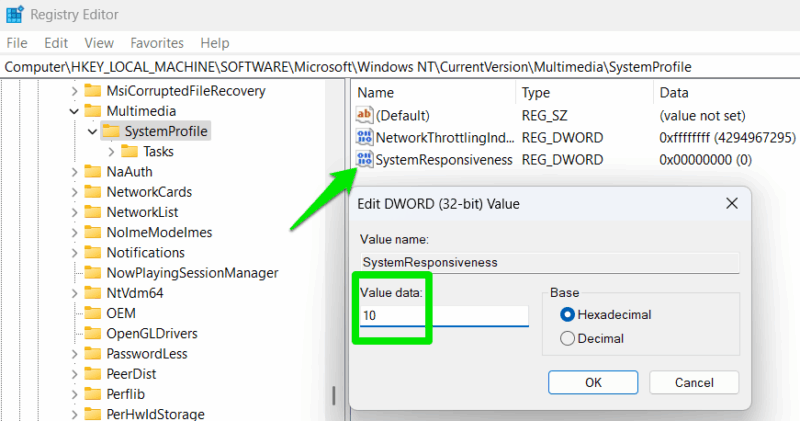
Move to the following location in the Registry:
HKEY_LOCAL_MACHINE\SOFTWARE\Microsoft\Windows NT\CurrentVersion\Multimedia\SystemProfileHere, double-click on SystemResponsiveness and set its value to 10. This will ensure that fewer CPU resources (10%) are reserved for background tasks and more for games. You can also set it to 0 to disable it, but only do it if you don’t multitask at all during gaming. Otherwise, you may face delays when switching from gaming to system functions.
Manually Adjust Game Mode Settings
As a gamer, you probably have enabled Game Mode in Windows. But did you know its settings can be manually tweaked? Using Registry, you can manually tweak these settings to always have the best performance when gaming. Game Mode often doesn’t use the most powerful priority settings by default, so it’s best to manually tweak it.
Go to this location:
HKEY_LOCAL_MACHINE\SOFTWARE\Microsoft\Windows NT\CurrentVersion\Multimedia\SystemProfile\Tasks\GamesNow set the following values:
- GPU Priority = 8
- Priority = 6
- Scheduling Category = High
- SFIO Priority = High
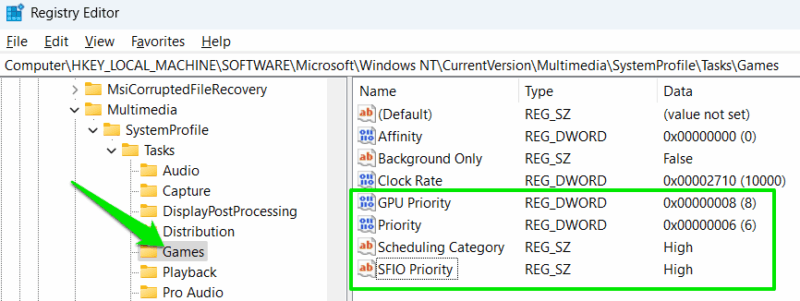
This will ensure your games get priority for all resources, including GPU, CPU, and even disk access.
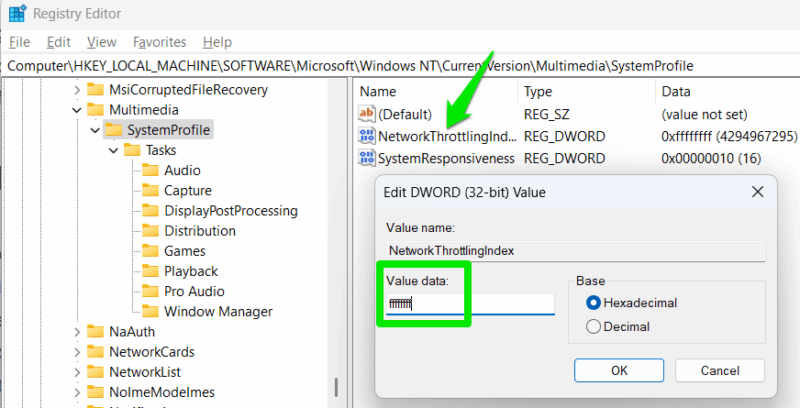
Disable Windows Network Throttling
This registry hack is a bit of a double-edged sword, but it can be beneficial if you are careful. Windows manages app network priorities to ensure priority tasks (like games) get the most resources. However, this sometimes also causes micro-latency and jitters even in priority tasks as it manages the network.
You can disable this to give full control in the hands of the apps. This will prevent latency, but it also means apps other than your game can use network bandwidth as they want. If you ensure no app/task is running in the background that can use bandwidth, then you can disable the throttling for a smoother experience.
Move the following location again:
HKEY_LOCAL_MACHINE\SOFTWARE\Microsoft\Windows NT\CurrentVersion\Multimedia\SystemProfileSet the value of NetworkThrottlingIndex to ffffffff. This will effectively disable it. If you face any problems, you can revert it by changing the value to a.
It’s worth mentioning that these are advanced tweaks that should preferably be applied after you have optimized your PC for the best gaming performance – otherwise, you won’t see a big difference. This is especially true when optimizing a laptop for gaming, as laptops are easily power throttled.


