When editing videos, the norm is to focus on the timeline. However, the new Microsoft Clipchamp’s transcript-based editing feature changes that. You can now trim videos by deleting transcripts in Clipchamp. Remove the unwanted parts, such as dialogue-heavy sections, from the transcripts and Clipchamp will trim the video accordingly. This guide explains the process of improving your video edits with transcript-based editing.
What is Transcript-Based Editing?
Transcript-based editing is a straightforward way to trim your video by deleting texts rather than cutting and rejoining the timeline.
You use the Clipchamp AI to generate a transcript of your video’s dialogue. Then, delete the parts you don’t want such as filler words, mistakes, or off-topic bits.
Note: this feature is a replacement for the old captions tab in Clipchamp.
After deleting the text, the editor will then trim the video to match your changes. This feature stands out among other video editing tools.
Why You Should Trim Video Using Transcripts
This feature speeds up workflow and saves time, especially for rookies who want to edit videos fast. You can trim the video by deleting transcripts to clean up the video. With this, gone are the days where you need experience to handle timeline scrubbing for dialogue-heavy videos.
Plus, Clipchamp is in the Microsoft ecosystem, so it integrates with OneDrive and SharePoint for smooth file management.
You can also tweak captions and export them as .srt files for easy accessibility. Besides, you can pair it with Clipchamp for work video templates to polish work projects.
What You Need to Get Started
To edit by trimming video transcript in Clipchamp, you need the following:
- A work or personal Microsoft 365 account to access Clipchamp.
- Ensure the video has spoken dialogue for transcription.
- Either use Clipchamp’s Windows app or a Chromium-based browser.
Note: this feature rolls out to work subscribers first before personal users can get them later.
Trim Video with Transcripts in Clipchamp
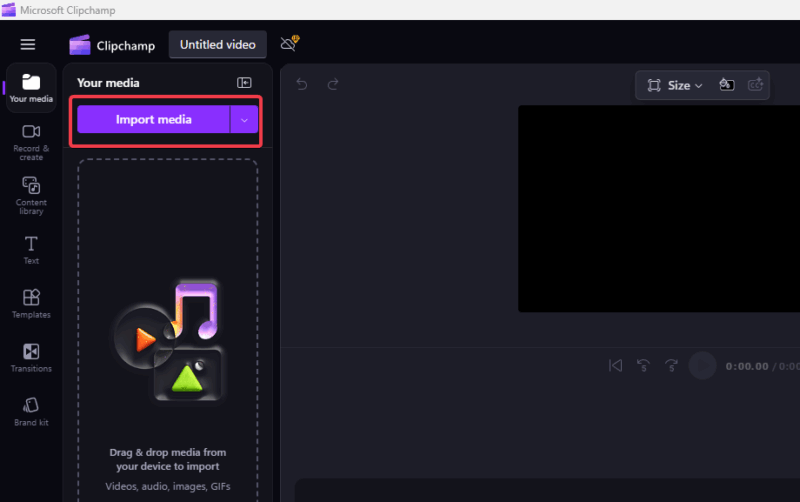
To use this feature, launch Clipchamp, and click import media.
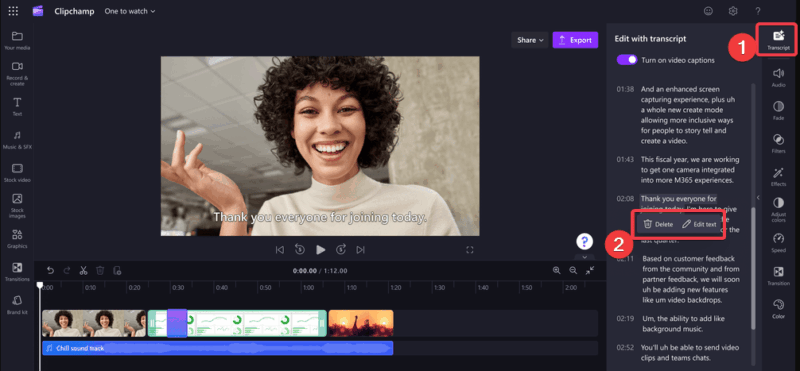
Locate the Transcript tab on the right-hand panel and click Generate Transcript. Once the video text is available, highlight the unwanted parts and click Delete to trim automatically.
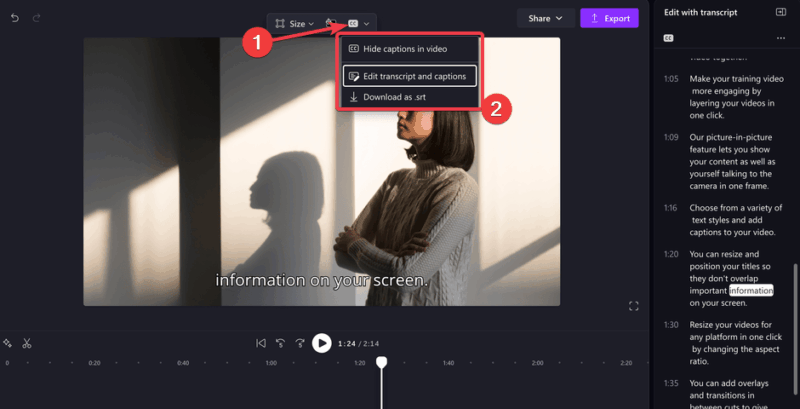
You can click the closed captions (cc) button to edit or download them as .srt files. Also, you can export your video to OneDrive or SharePoint.
It’s that easy to create clean, professional videos without wrestling the timeline. This adds up to one of the reasons we think a Microsoft subscription is worth it.
Tips to Get the Best Results
Some of the things to keep in mind when trimming videos by deleting transcripts in Clipchamp are:
- Use clear, high-quality audio to get accurate transcription.
- Cross-check the transcript for errors before editing.
- Pair with Clipchamp’s tools like noise suppression to improve the results.
- Always save a copy of the original video as a backup to compare after editing.
Video editing doesn’t get easier than using this transcript-based option. Quickly trim your videos by deleting the transcripts to get professional edits on meetings, tutorials, podcasts, and other dialogue-heavy videos. Give it a spin now and tell us how it goes in the comments!