With Canva acquiring Affinity and offering it for free, you now have professional design software with capabilities similar to the Adobe Creative Cloud, but without the financial barrier. Affinity combines photo, vector, and layout tools into one interface. However, its technicalities differ from Adobe’s, so here’s how to migrate your archive without losing your data.
Note: Most of Affinity’s tools are free, but if you want some AI tools, you’d have to pay for them.
Before You Cancel Adobe, You Should Prep Your Archive First
If you want to move to Affinity, don’t cancel your subscription yet. Once your plan lapses, Adobe apps enter a restricted mode where you cannot save or export files.
To prep your archive, first make a quick list of must-keep files. Then, open every important file at least once in the Adobe app. This forces fonts, links, and embedded assets to load properly. Affinity may open them as blank or flattened if they were optimized or left unopened for a long time.
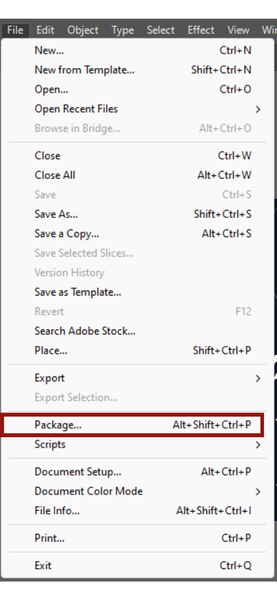
Be sure to Package your project folders. Missing links are the main reason migrations fail when moving from Illustrator or InDesign. Run the Package command under the File menu, to automatically gather your document and all its external assets into one self-contained folder.
Next, re-embed or relink any missing images before exporting. Affinity can only import what’s embedded or properly linked, and PSD/AI/IDML exports won’t fix broken or missing assets.
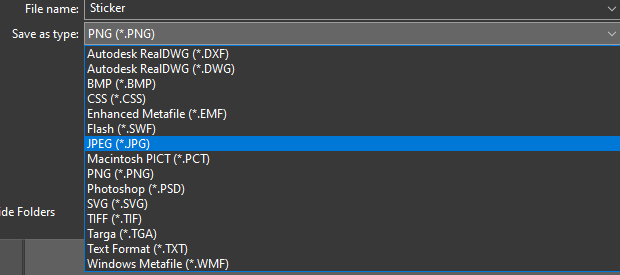
Once you do this, export fallback copies: PSD ->TIFF (flattened), AI -> PDF, INDD -> IDML.
Then save everything in one Migration folder.
Note: You will lose access to Adobe Fonts when migrating. So, you may need to hunt down open-source alternatives. Truth be told, Google Fonts is your best friend here, or if you have the funds, buy perpetual licenses for your branding fonts.
Moving Your PSD Designs into Affinity
Affinity’s Pixel Persona opens PSD files with very few problems. When I moved a couple of files, layers, masks, blend modes, and most adjustment layers behaved almost identically. One little issue I did face was that smart objects import as embedded layers, which means you lose Adobe’s smart filter behavior but keep the visual result.
Another silent but common issue is that color profiles do not match across apps. If colors look off after importing, go to Document -> Setup -> Convert ICC Profile.
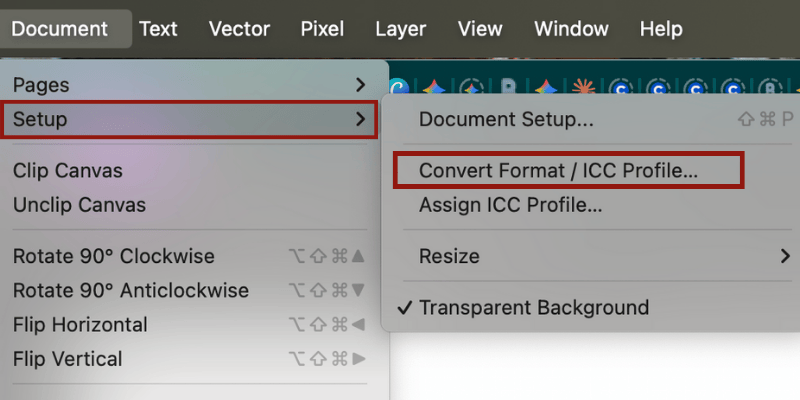
Switch the file back to its original profile (e.g., Adobe RGB or your CMYK preset). When you do all these, always choose Convert, not Assign, and turn on profile warnings in preferences to prevent mismatches in the future.
Tip: To protect yourself from any differences after import, always keep two fallback versions. A flattened TIFF for perfect visual accuracy and a clean layered PSD for structure reference. The TIFF acts as a snapshot of what the project should look like, while the layered PSD helps you rebuild anything Affinity interprets differently.
Moving Your AI Designs into Affinity
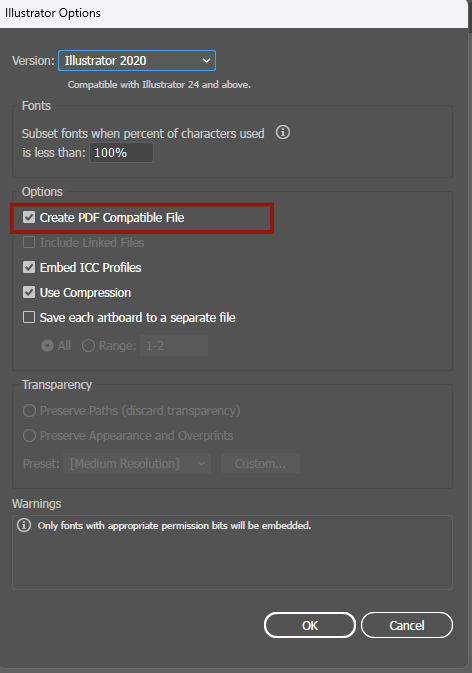
Affinity opens AI files, but they need to have PDF compatibility enabled. If your AI files weren’t saved with that setting checked, Illustrator is the only place that can rebuild them properly.
To ensure your files are compatible, in the options dialog, ensure Create PDF Compatible File is checked.
Open the file in Illustrator. Go to File -> Save As and select .AI format. In the Options dialog, ensure Create PDF Compatible File is checked.
Alternatively, you can save a pure PDF. A PDF is the most widely compatible vector format, and even if your AI file won’t open, a high-quality PDF will almost always import into Affinity with your vector paths intact.
Shapes, curves, basic effects, and most vector paths transfer well; however, when I experimented with it, clipping masks layered too deeply, or live text on complicated paths, could have some distortions.
Moving Your INDD Designs into Affinity
Based on my experience, InDesign files require the most preparation. Affinity cannot open INDD files directly, so you must export every project to IDML using InDesign itself.
To do this, open your project in InDesign, go to File -> Export. Choose InDesign Markup (IDML).
Once converted, most layouts open cleanly. Pages, master pages, linked images, and threaded text frames usually come through without major issues. For me, the problems appear in the details, like complex text wrap rules, GREP styles, and certain multi-level paragraph styles, which do not always translate correctly.
Tip: If you use Adobe shortcuts a lot, you can remap Affinity shortcuts to match Adobe’s in the Preferences menu to make your transition smoother.
The Costs of Switching (And Why I Still Think It’s Worth It)
Switching from Adobe does come with tradeoffs, as you lose the convenience of Adobe’s ecosystem. For me, some functions I will miss include using Color Guides and Themes alongside fonts I’ve had and kept over the years.
Some Illustrator and InDesign files will also require cleanup after import, and you may not like the stress that comes with that. However, note that none of this is dramatic, but it does mean setting aside time to review your archive.
Despite the friction, the trade-off is the price. With Affinity, you have full ownership, and your projects become local and fully accessible without a heavy subscription.
For more context on Affinity’s new parent company, Canva, take a look at their visual work suite. If you need other options, you can find more Adobe Photoshop alternatives here.