
Microsoft Defender quietly runs several background tasks, including daily quick scans and real-time checks of every file you or an app opens, and those processes can affect PC performance. If you find that your Microsoft Defender is always using high CPU resources, try the methods below to make it requiring fewer system resources on your system.
Control CPU Resources for Microsoft Defender Scans
By default, Defender’s background scans run on normal priority, and it’s allowed to consume up to 50% of CPU resources if needed. This means that when the scan runs, it’s allowed to directly compete for resources with foreground programs, and it can possibly consume 50% of the CPU resources.
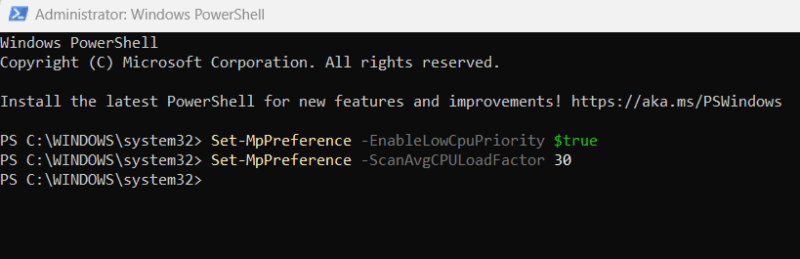
To ensure your foreground apps get the most CPU resources when the scan runs, you can decrease the scan’s priority and resource usage limit using PowerShell commands. Type powershell in Windows Search, right-click on Windows PowerShell, and select Run as administrator. Enter the following commands here:
Set-MpPreference -EnableLowCpuPriority $trueThis will set the priority to low.
Set-MpPreference -ScanAvgCPULoadFactor 30This will set the CPU usage limit to 30%. You can go even lower, but we don’t recommend going below 15% as it can severely slow down the scan.
You can reset the changes by using the following commands:
Set-MpPreference -EnableLowCpuPriority $false
Set-MpPreference -ScanAvgCPULoadFactor 50
Move Data to a Dev Drive
Dev Drive is a ReFS-formatted drive made for heavy workloads that require stability and speed. Microsoft Defender has a special function for Dev Drives, where the scans are deferred for files to complete later, removing the latency caused by it. This is especially useful for data with a lot of files. The main downside is a bit less security due to scans happening only after opening the file.
You can create a Dev Drive and move frequently used data there to prevent the Defender from slowing it down.
Manage Archive Scanning
To scan archives, Microsoft Defender first has to decompress them. This process consumes a lot of CPU power, and it can impact PC performance if you have lots of archives. While disabling scanning of archives is possible, it’s not recommended, as malware is often hidden in archives to avoid detection.
Instead, you can configure Defender to only scan archives that are bigger than a specific size. Most malware is in smaller archives, and for occasional big archives, you can manually scan them. You can do this with a Registry hack. Here’s how:
Warning: any incorrect edits in the Windows Registry can cause system corruption and data loss. Make sure you back up the Registry before following the instructions.
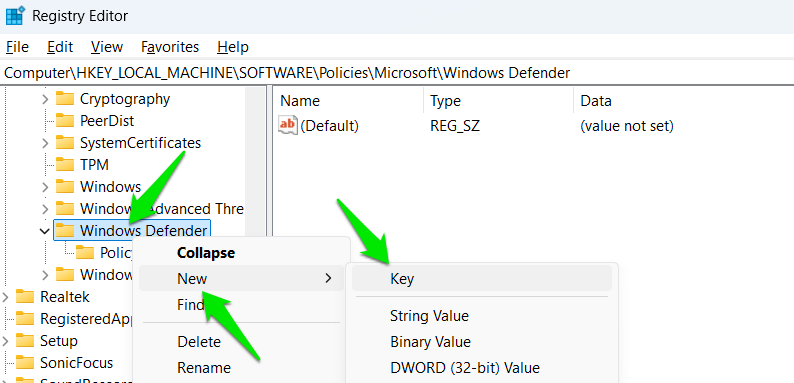
Open the Windows Registry and move to the following location:
HKEY_LOCAL_MACHINE\SOFTWARE\Policies\Microsoft\Windows DefenderRight-click on Windows Defender and select New → Key. Name this new key Scan.
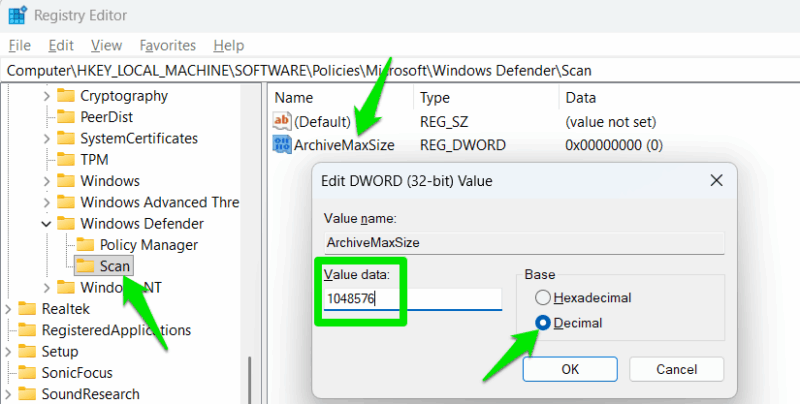
With the new Scan key selected, right-click in the right panel and select New → DWORD (32-bit) Value. Name this DWORD as ArchiveMaxSize. Afterward, double-click on it, select Decimal under Base, and provide the maximum size in KBs. For example, if you want to limit the scan to under 1 GB archives, enter 1048576 (that’s 1GB in KBs). To undo the changes, just delete this DWORD value.
Manage Scan Time
To minimize Microsoft Defender scans using too much of the CPU resources while scanning your PC, you can select a more appropriate time and frequency. While it scans daily, you can change it to a weekly scan for fewer intrusions. As long as the real-time protection shield is active, scan frequency won’t make much difference.
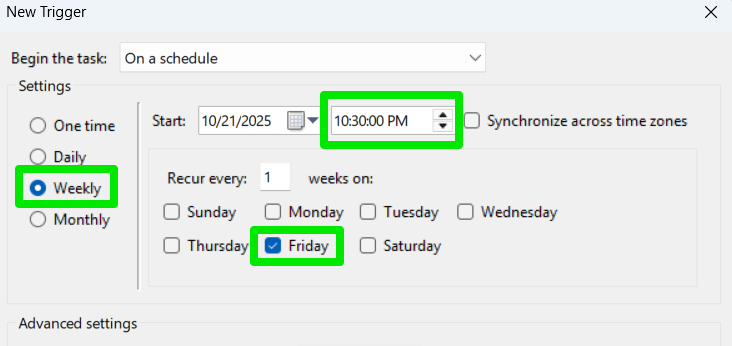
To do so, open the Task Scheduler and go to Task Scheduler Library → Microsoft → Windows → Windows Defender. Here, double-click on Windows Defender Scheduled Scan and click on New under the Triggers tab.
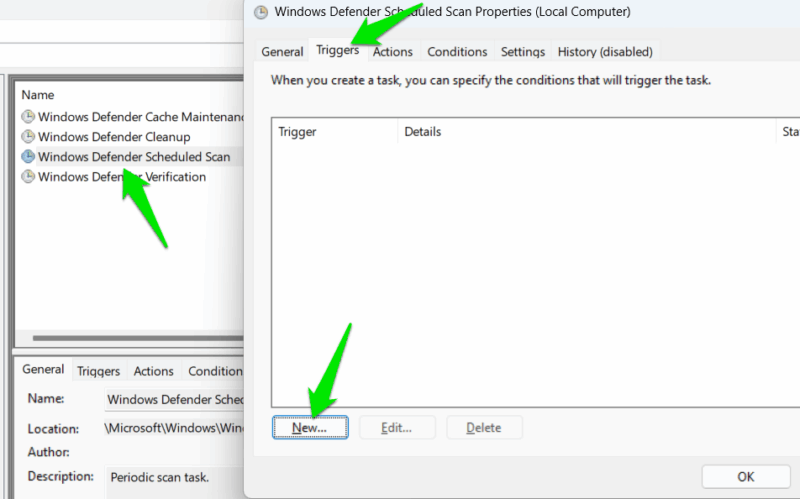
Now, set scan time, frequency, and the day of the week that best suits your needs and click on OK. That’s it, now the scan will happen on a weekly basis at your set time.
Avoid Using Advanced Security Features if Not Necessary
Microsoft Defender has many advanced features that are disabled by default, as they aren’t necessary for security and consume extra resources. Unless necessary, try not to use those advanced features as they can lead to Defender running more tasks and consuming more resources. This includes features like Application Guard, Controlled Folder Access, Memory Integrity, and more.
These tweaks will ensure Microsoft Defender still provides the necessary protection while ensuring your day-to-day usage isn’t affected, which is better than disabling Microsoft Defender. These tweaks are especially helpful when optimizing a PC for gaming, where minor interruptions can ruin the experience.


