
When your Windows system freezes or crashes, it can be frustrating and time-consuming to diagnose and fix the issue. By enabling certain hidden features in Windows, you can proactively equip your system with tools to simplify problem-solving later.
Enable Verbose Status Messages
Windows completes many processes when starting or shutting down, but the user is only shown that Windows is starting or shutting down, not the actual actions. If you enable verbose status messages, it will show exactly what it’s doing during the startup or shutdown, like loading device drivers, starting Windows services, applying group policy, etc.
This information can be crucial if you face problems like slow boot times or Windows not starting. These messages will tell you exactly what Windows was doing when you faced the problem, allowing you to pinpoint the issue. Here’s how to enable them:
Warning: incorrect edits in the Windows Registry can lead to data corruption and system instability. Make sure you back up the Registry before following the instructions.
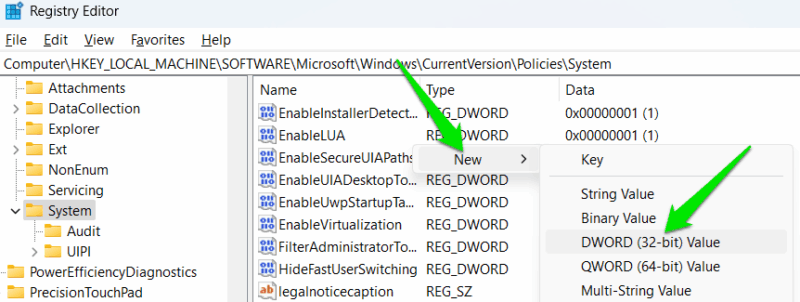
Type “regedit” in Windows Search to find and open the Windows Registry. Move to the following location here:
HKEY_LOCAL_MACHINE\SOFTWARE\Microsoft\Windows\CurrentVersion\Policies\SystemRight-click in the right panel and select New -> DWORD (32-bit) Value.
Name this value VerboseStatus, double-click on it, and change its value to 1.
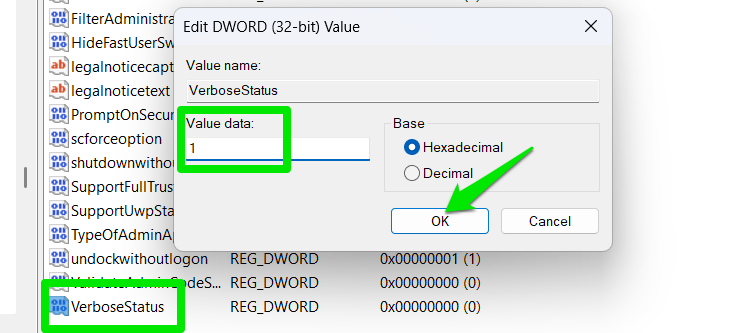
This will enable verbose status messages, and you can disable them again by either deleting this new Registry value you created or setting its value to 0.
Add End Task to Taskbar
Most of the time when you have to kill a program due to a memory leak, you will find that opening the Task Manager (to end the app) can be very sluggish too and may even cause a system crash.
The easier solution is to put the end task button in the taskbar so you can just right-click on the problematic program icon and select End task to get rid of it.
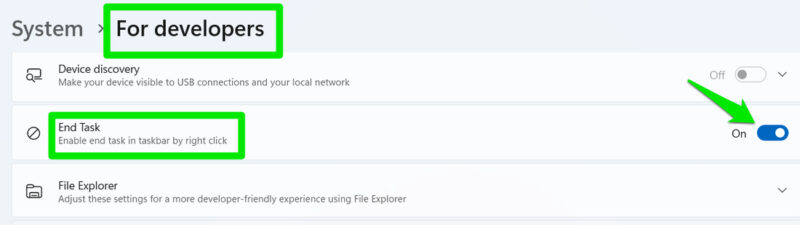
To do so, open Windows Settings, go to System -> For developers, and enable the End Task option.
Disable Auto-Restart on BSoD
By default, Windows restarts automatically after a Blue Screen of Death (BSoD). The BSoD displays error details and possible causes, but disappears in a second or two. Windows does generate a dump file for later analysis, but most users lack the tools or expertise to open or interpret it.
Searching for the error online is often the quickest way to diagnose the problem, yet you can’t do that when the screen vanishes so fast. Thankfully, you can disable the auto-restart behavior to copy all the information you need before restarting your PC using the power button.
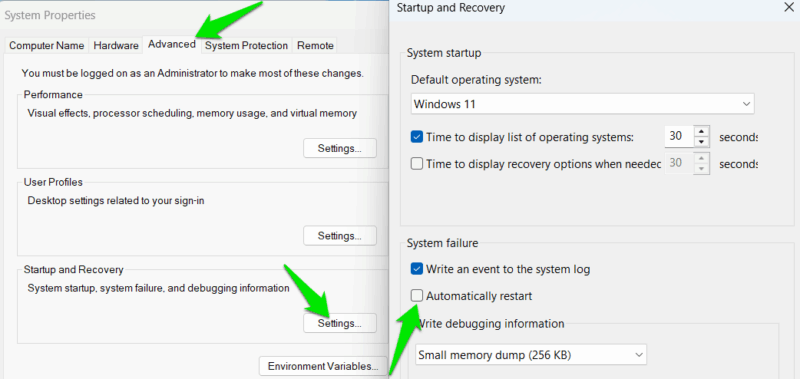
Press the Win + R keys and type sysdm.cpl in the Run dialog to open System Properties.
Move to the Advanced tab and click on Settings under the Startup and Recovery section.
Here, uncheck the Automatically restart option under the System failure section.
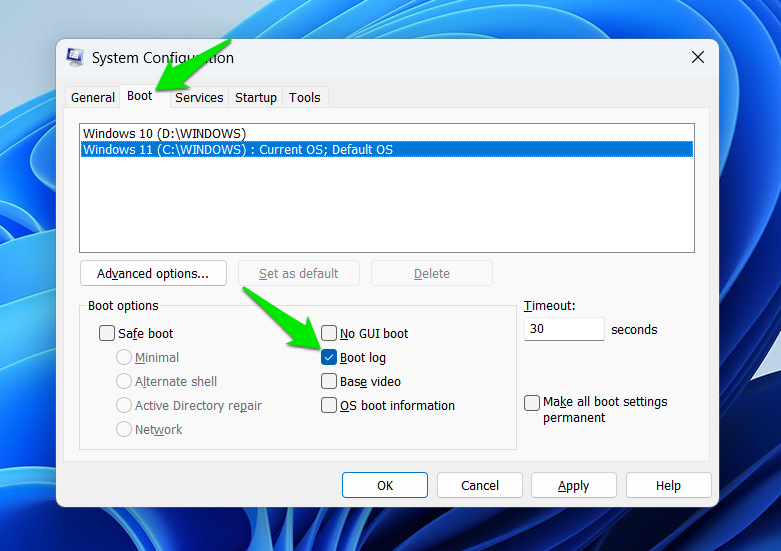
Turn On Boot Logging
Boot log is a Windows setting that will create a log of all the drivers and services launched during boot. This file can be extremely useful for troubleshooting boot-related problems or startup services not working properly. While you can use this function on demand, it’s better to prepare for the future and always have it enabled to catch a problem as it happens.
Press the Win + R keys and type msconfig in the Run dialog to open System Configuration.
Move to the Boot tab and enable the Boot log option. If you have a dual-boot setup, select the OS at the top for which you want to enable boot logging.
Enable Legacy F8 Safe Mode Menu
It’s quite cumbersome to access safe mode in newer versions of Windows since it’s part of Windows Recovery Environment (WinRE). On most PCs, if your PC isn’t starting up, you won’t even be able to access WinRE without failing the startup a few times. Fortunately, you can still enable the legacy F8 Advanced Boot Options menu in Windows 11. Here’s how:
Search “cmd” in Windows Search, right-click on the Command Prompt, and select Run as administrator.
Here, run the following command:
bcdedit /set {default} bootmenupolicy legacy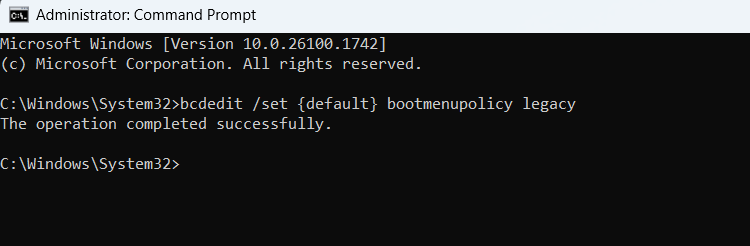
You should see an operation successful message confirming the change. If you need to undo this change, run the following command instead:
bcdedit /set {default} bootmenupolicy standardNow, when the PC is starting, press the F8 key continuously until the Advanced Boot Options menu appears. On very fast devices, the window to press the button might be too short, but it should work in most cases. You can also disable fast startup to increase the chances of accessing it.
With these features enabled, troubleshooting Windows problems should be easier and snappier. Best of all, these features don’t interfere with your normal Windows usage, unlike some other Windows features that do more harm than good.


