No matter how you pronounce GIF, you can’t deny that GIFs are a major force in Internet humor. They’re exceptionally useful on the web, as they allow you to use a lightweight form of animation that can bring some life to your content without the performance cost that comes with videos. This tutorial demonstrates how to make a GIF from a video using two open source programs: VLC and GIMP.
Good to know: did you know that you can now record your screen as a GIF using the Windows Snipping Tool? Here’s how.
Method 1: Use a VLC Extension
Perhaps the easiest method to make your GIF is to use an extension for VLC. Here are the tools you’ll need for this:
- VLC
- FFMPEG
- VLC GIF Maker (Windows, macOS, Linux)
To download FFMPEG, check the Get packages & executable files section and select your operating system. This is an open-source program for breaking up your video into frames. It uses command-line for audio and video conversions.
On Windows, unarchive the file you’ve downloaded and change the folder name to ffmeg. Copy it on your C:\ drive. Next, open up Command Prompt as administrator and type the following command to install FFMPEG and add it to Path in Windows, then press Enter.
setx /m PATH "C:\ffmpeg\bin;%PATH%"On Mac, you’ll also have to add the FFMPEG directory to the Path file via a terminal window using the following command. Replace [Your FFMPEG directory] with your path to the FFMPEG directory.
export PATH=$PATH:[Your FFMPEG directory]On Linux, you can install FFMPEG through your package manager. For instance, for Ubuntu/Debian use this command:
sudo apt install ffmpegOnce you have VLC and FFMPEG all set up, you need to take care of one last step. You will need to add the extension file in the suitable directory for it to appear in VLC. For this tutorial we’re using a Windows device, so we opened File Explorer and pasted the following path at the top, then copied the extension file at this location.
%ProgramFiles%\VideoLAN\VLC\lua\extensions\For the specific paths for your operating systems, check the extension’s GitHub page.
Creating a GIF with the VLC GIF Maker
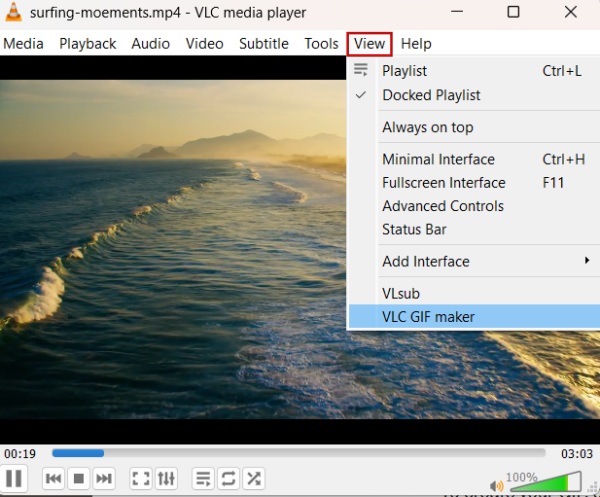
To create your GIF, go ahead and open a video in VLC. Navigate to View -> VLC GIF Maker.
The extension interface will now appear on your screen. Use the VLC bar at the bottom to navigate to the exact moment in the video when you want it to begin. Press the button Get to set the GIF start time. Do the same for the end time.
Now, add the directory where you want the extension to save your GIF. Make sure it’s the correct path. Double-check if necessary. Finally, name your GIF (optional) and press the Generate GIF button.
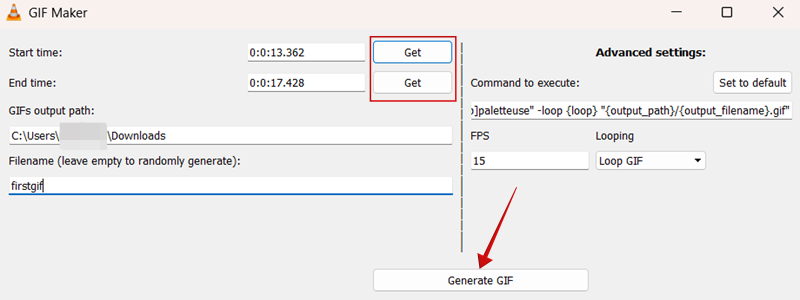
The Command Prompt should pop up next, suggesting that the process is underway. Once the window closes, you’re free to check the directory you’ve set earlier. You should find the GIF there.
What If You Can’t Find the GIF?
This is an issue we had to deal with after installing the extension. To fix this, we suggest trying the following:
- Try creating a GIF from another video
- Check whether you installed FFMPEG properly by using this command in Command Prompt:
ffmpeg -version - Run the command that VLC GIF Maker generates for you in Command Prompt:
ffmpeg -ss {start_timestamp} -to {stop_timestamp} -i "{input_file}" -vf "fps={fps},scale=498:-1:flags=lanczos,split[s0][s1];[s0]palettegen[p];[s1][p]paletteuse" -loop {loop} "{output_path}/{output_filename}.gif"Don’t forget to add your own timestamps and directories.
- Restart your device (this one worked for us)
Tip: here’s how you can use VLC to download subtitles on desktop or on mobile.
Method 2: Use VLC and GIMP
In case you don’t like the idea of using an extension, you can try this alternative method that makes use of GIMP to create the GIF. First make sure you have all the tools:
- VLC
- FFMPEG
- GIMP
Create a clip with VLC
The first step is to cut your video using VLC to include only the parts you want in the GIF. You can do this by using the program’s recording controls.
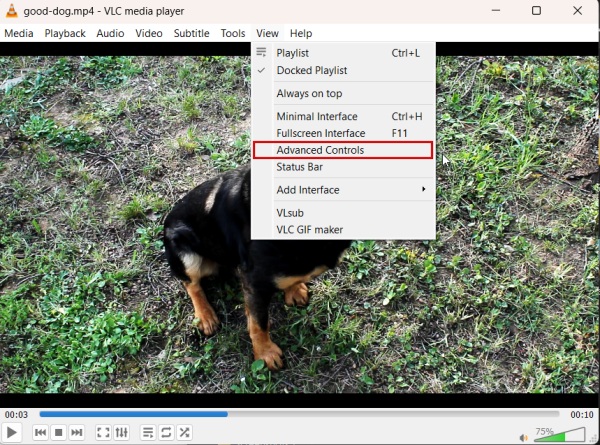
On the main menu across the top of VLC, click on View. Check the box next to Advanced Controls. The controls will appear at the bottom of the VLC window above the normal VLC controls.
Open the video that you want to extract your clip from. Use the slider to search through the video for the part you want to convert into a GIF, and locate the start point of your clip. Place the slider right where you want it to begin recording.
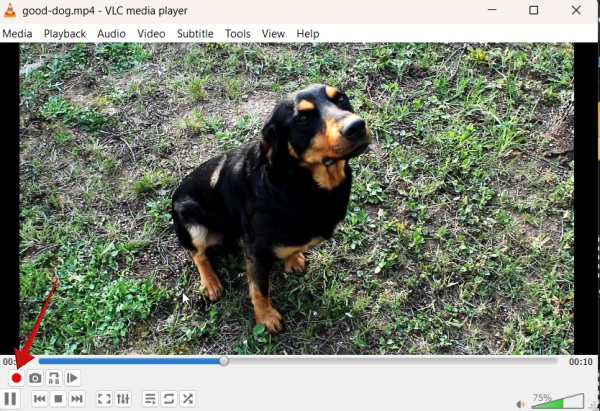
Once you’re where you want the clip to begin, click the red circle button at the bottom to start recording. Allow the video to play to where you want your clip to end. Then, press the record button again to stop it.
Your clip will be located in either “C:/Users/Your Username/Videos” or “~/Videos” for Windows and Linux, respectively. Sometimes Linux might place it in your “/home” directory. The video will begin with vlc-record, followed by the date. You can then rename the clip whatever you would like.
Separate the frames with FFMPEG
GIMP doesn’t work directly with video files, so you’re going to need to convert your clip into frames first. That’s where FFMPEG once again comes in to break your clip into individual frames.
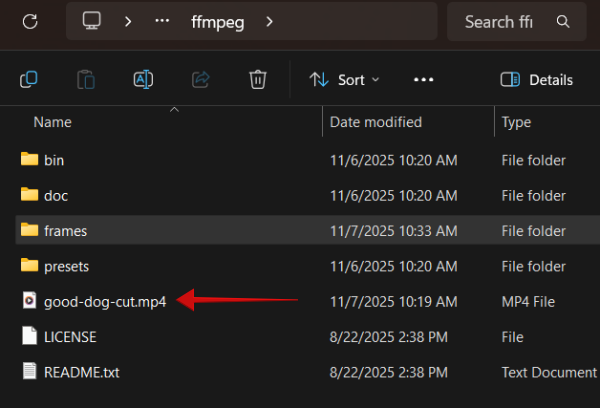
Before proceeding, we suggest moving the video you created in the previous step to the ffpmeg folder on your C:\ drive. Also create a new subfolder called frames.
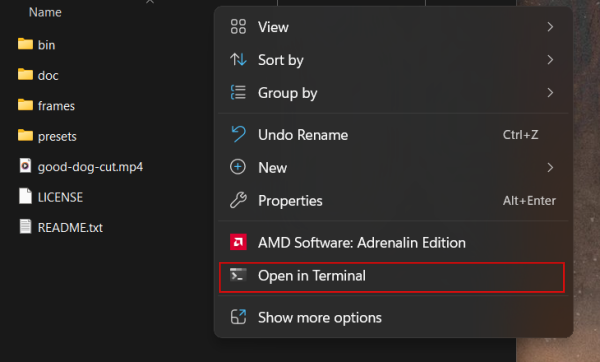
Open a Terminal window in that directory. In Windows and most Linux desktop environments, right-click on an empty space in the window to get a menu that allows you to open a Terminal window. On Mac, use Spotlight search to open a Terminal window.
In that window, type the following command to use FFMPEG to break up your clip. Make sure you replace name-of-clip.mp4 with the actual name of your video, as well as its specific format. In this example, our clip is called good-dog-cut, and it’s in MP4 format.
ffmpeg -i name-of-clip.mp4 -r 15 frames/image-%3d.png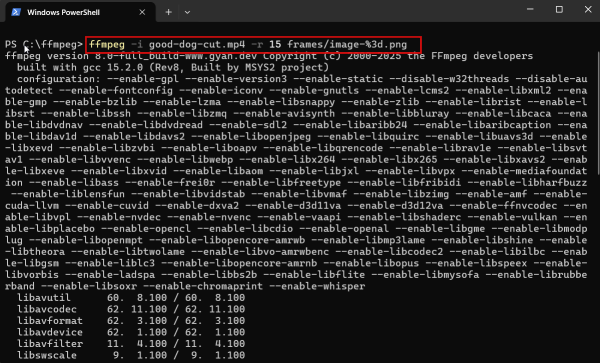
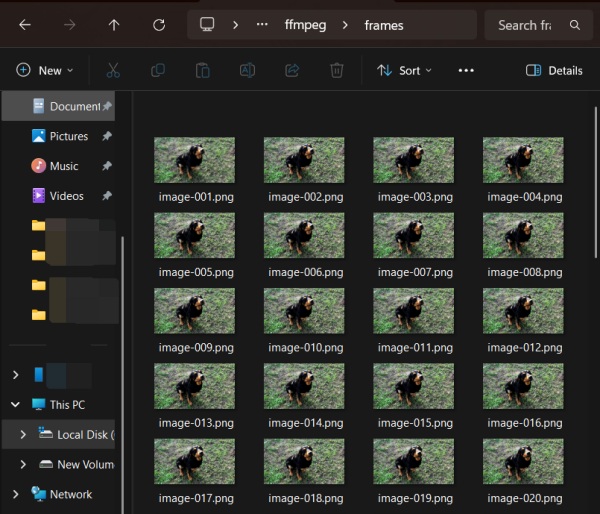
It may take a few seconds, but FFMPEG will break your file down to its frames at a rate of 15 frames per second and place the resulting images in the frames folder that you created.
Turn the clip into a GIF with GIMP
You’re finally ready to use GIMP and put together your GIF.
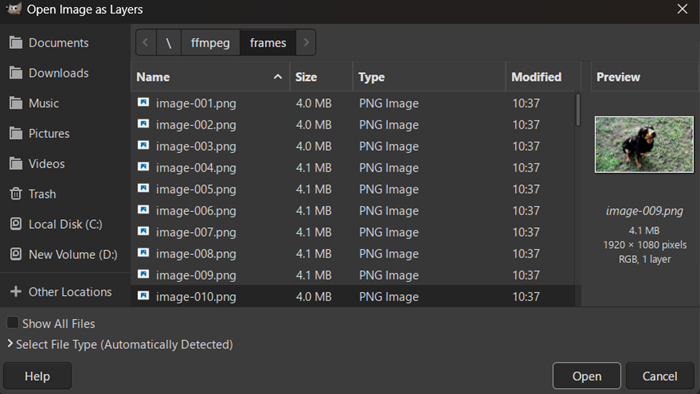
Open GIMP. Click on File -> Open as Layers or you can press Ctrl + Alt + O instead. For more GIMP shortcuts, check our cheatsheet.
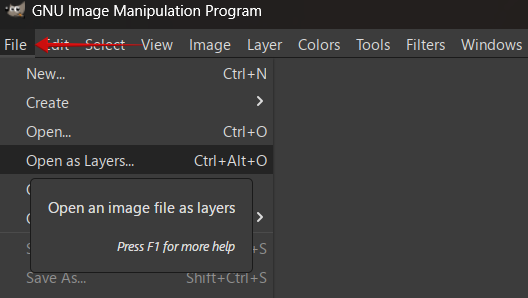
Browse to the folder where you directed the frames to output from FFMPEG. Select all the frame images. You can use Ctrl + mouse click or Shift + mouse click to select more at the same time. When you have them all, confirm with the Open button.
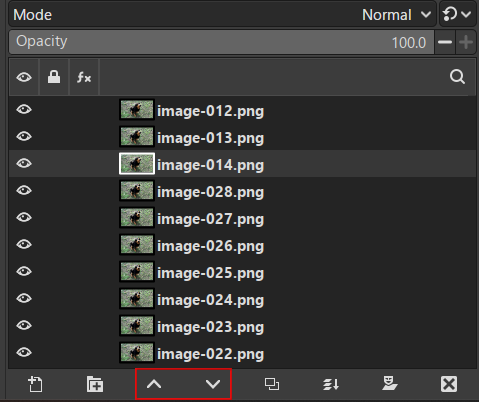
GIMP will create a new project and place each of your frame images as its own layer. These will be used to recreate the video as an animation when you export it to a GIF.
Also, make sure that your layers are in the correct order. If they aren’t, use the tiny arrows at the bottom of the layer space to move them around.
Edit Your Frames
This section is entirely optional. If you just want to make a GIF of the clip, with no alterations, you don’t need to do anything here. This part just covers, briefly, what to do when you wish to add something like text to your image.
Think of your layers as pages in a flipbook. Anything you add to one will appear in that frame of the GIF. To add text or something similar across multiple frames, start by creating a text layer at the very top.
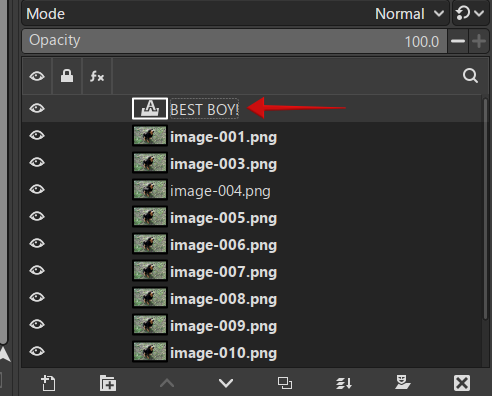
Go ahead to clone it, so the same text will appear on the next layer and so on. You can do this by right-clicking on the text layer and selecting the Duplicate Layers option, then arranging it into position on top of the following layer.
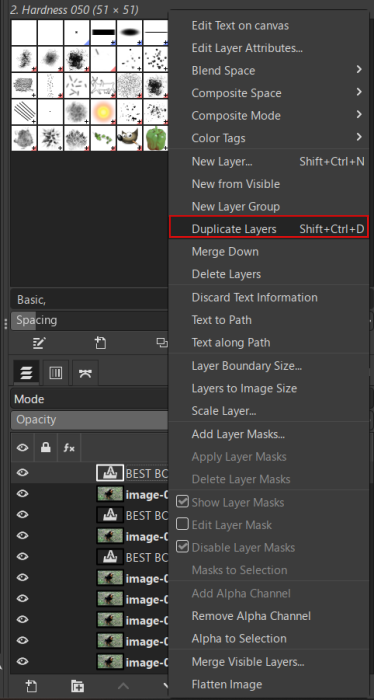
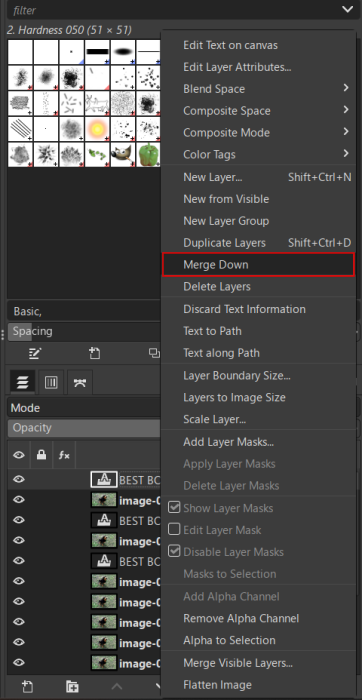
Once you’ve set the new text layer, right-click it and select Merge down. You will need to do this for each of your frames.
The same is true if you’d like to add animation or anything else. Remember that GIMP will treat each layer as a frame in the animation, so everything extra that you add needs to be added to each layer and then be merged into it.
Previewing Your GIF
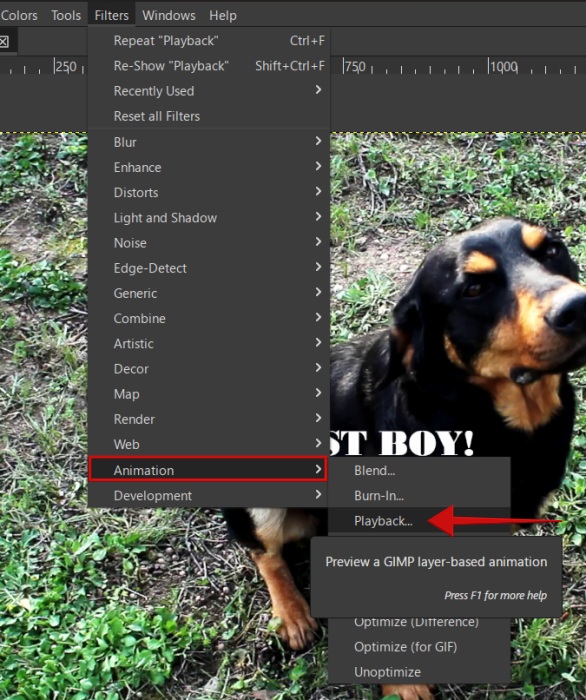
Once you’ve added all the additional elements to your GIF, you can preview your creation by clicking Filters -> Animation -> Playblack. Press the Play button to see your GIF in action.
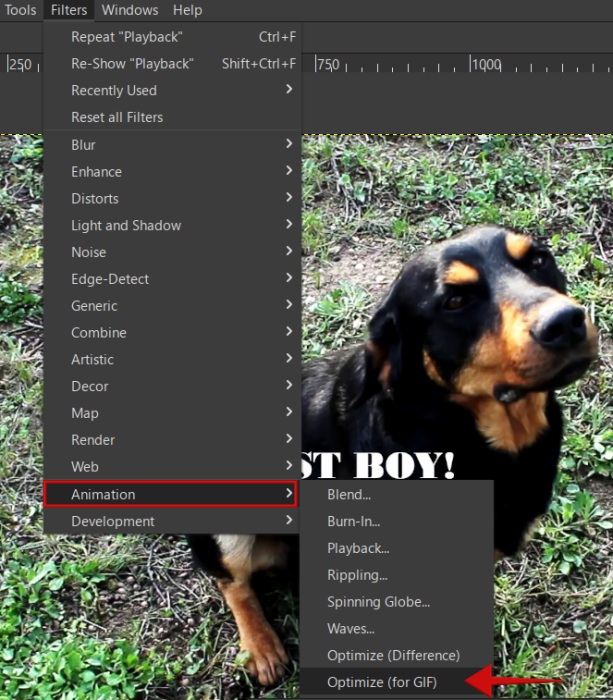
If you like what you see, you can go to the next step. Click on Filters -> Animation -> Optimize your GIF. This is one of the last steps before saving your GIF.
Save the GIF
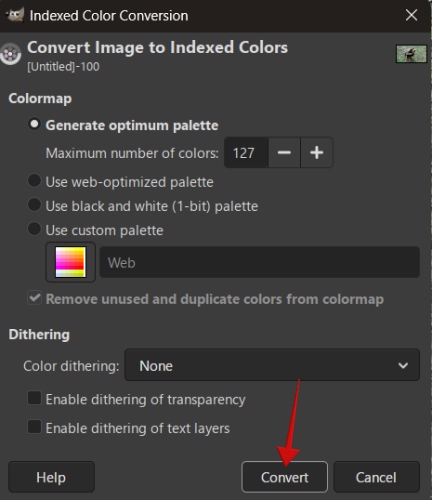
Before you can export your GIF, you’re going to need to convert it from RGB to Indexed. It works better for GIFs, and it’ll allow you to reduce your file size. Go to Image -> Mode, and switch from RGB to Indexed.
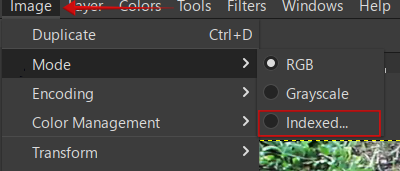
In the pop-up, set the Maximum number of colors to 127 and press Convert.
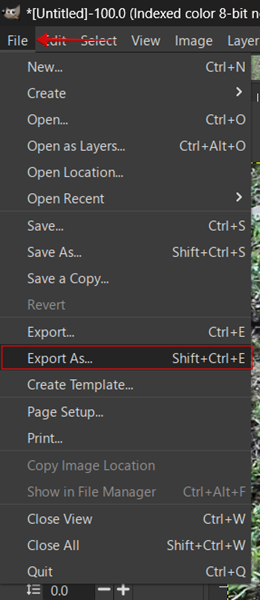
Finally, you’re ready to export your GIF. Go to File -> Export As, and name your creation at the top. Don’t forget to add the .GIF extension at the end.
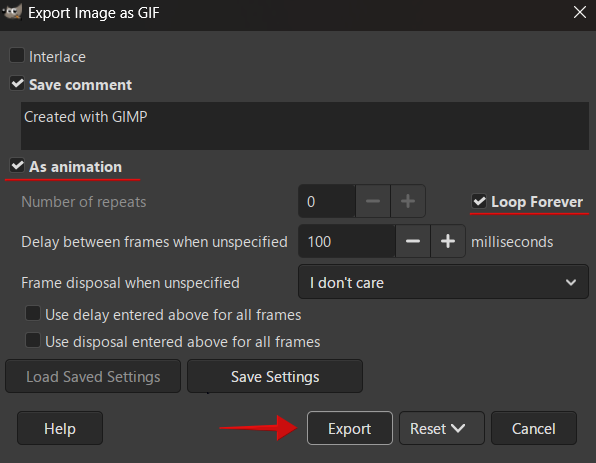
In the next window, check the box next to As animation to automatically select the Loop forever option. Finally press Export.
Congrats! You now have a working GIF created straight from your video file. You can, of course, repeat this process with nearly any video file, and make all sorts of GIFs from anywhere.
Note: if you wish to create a GIF from images, you can use GIMP and import them as layers. Then follow the same steps outlined above to create your GIF.
If you’d rather not have to install any apps of programs to create a GIF, the good news is that you can. Check these easy GIF-making methods here.