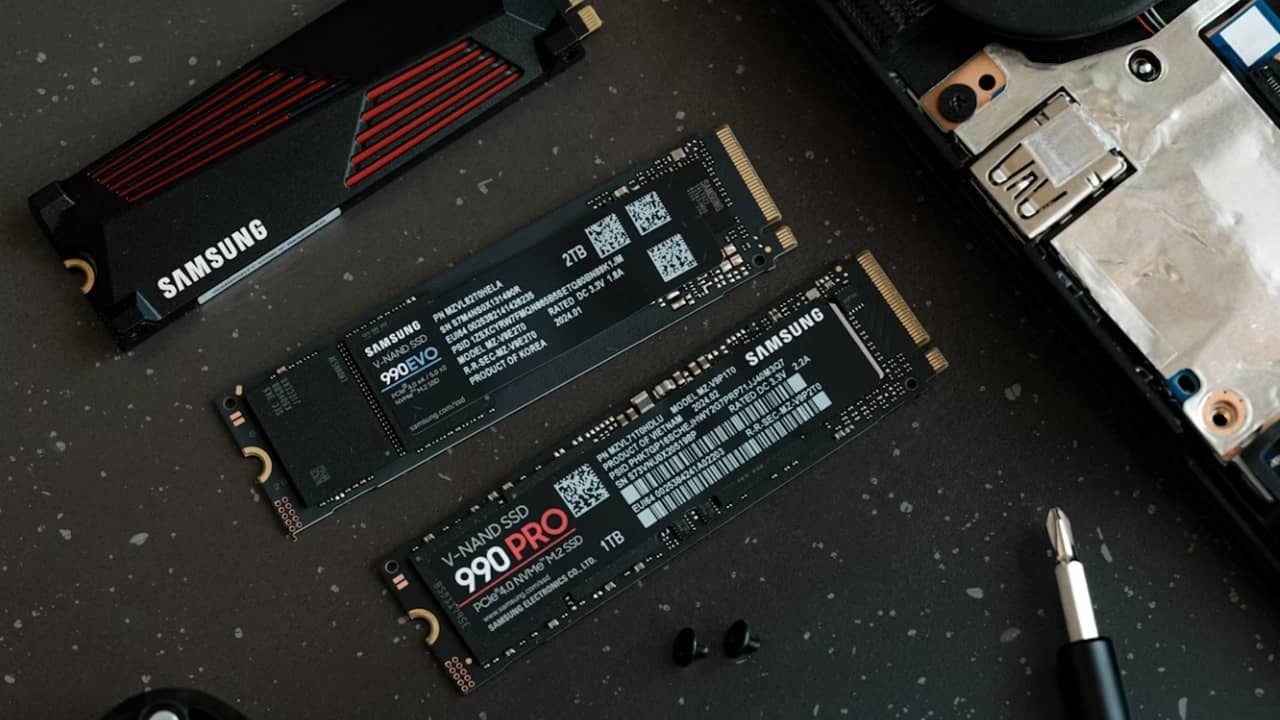
Windows has many features that help solid-state drives (SSDs) operate to their full potential, but it doesn’t always enable them by default. When using an SSD in Windows, there are a variety of ways to help extend SSD life to get more out of your PC and drive.
1. Disable Fast Startup
Yes, this one may sound counterintuitive, given that fast startup was pretty much designed to make the boot process faster for systems with SSDs.
But at this point, the time gained from fast startup is negligible if you have an SSD, and disabling fast startup means your PC gets a nice clean full reboot each time you shut down. If your PC’s boot process feels a bit slow, try these tips to speed it up.
There are various niche issues fast startup can cause, too. For example, if you dual-boot, you may not be able to access your Windows drive, as it could get locked. Disabling fast startup isn’t essential but could be useful.
To disable fast startup, go to Control Panel -> Power Options -> Choose what the power buttons do.
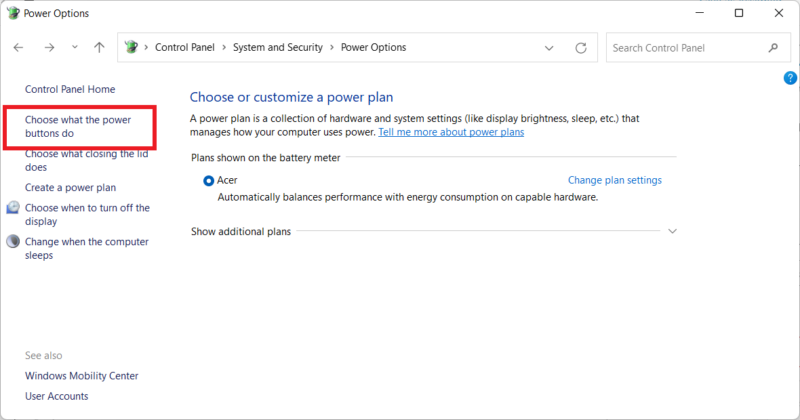
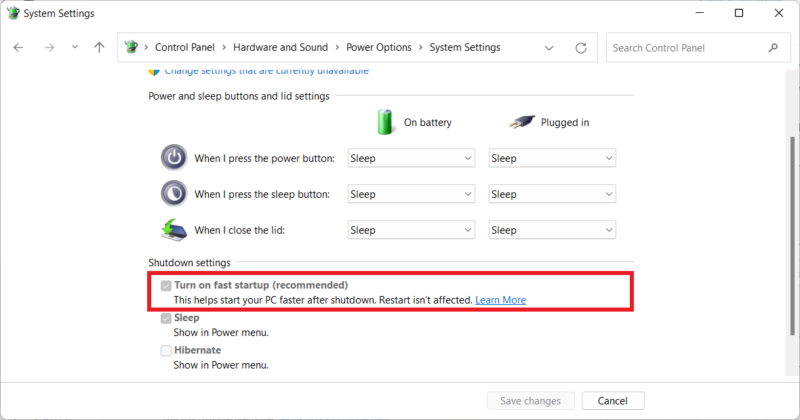
Next, click Change settings that are currently unavailable (if the fast startup box is greyed out), then uncheck the Turn on fast startup box.
2. Update the SSD Firmware
Updating firming helps extend SSD life by optimizing performance. Unfortunately, updates aren’t automated; the process is irreversible and a bit more complex than, say, a software update.
Each SSD manufacturer has its own method for SSD firmware upgrades, so you’ll need to go to the official website of your SSD manufacturer and follow the guides from there.

A handy tool to assist you, however, is CrystalDiskInfo, which displays in-depth information about your disk, including the firmware version.
3. Enable AHCI
The Advanced Host Controller Interface (AHCI) is a paramount feature for ensuring that Windows supports all the features that come with running an SSD on your computer, especially the TRIM feature, which allows Windows to help the SSD perform its routine garbage collection.
The term “garbage collection” is used to describe the phenomenon that occurs when a drive gets rid of information that is no longer considered to be in use.
To enable AHCI, enter the BIOS of your computer, and find the appropriate setting. Each BIOS functions differently, so you’ll have to do a bit of hunting. Chances are that newer computers will have this enabled by default, especially if it came with an SSD. It’s recommended that you enable this feature before installing the operating system, although you may be able to get away with enabling it later, too.
4. Enable TRIM
TRIM is vital to extending your SSD life, namely by keeping it clean under the hood. Windows should enable this by default, but it’s worth double-checking.
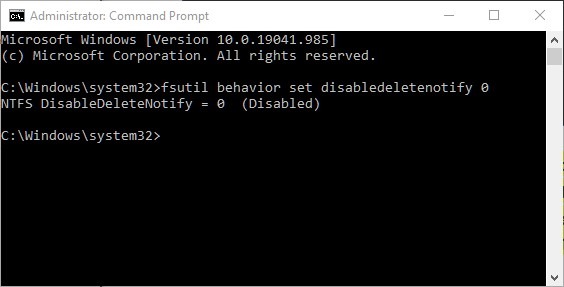
To make sure TRIM is enabled, open a Command Prompt window, and execute the following command:
fsutil behavior set disabledeletenotify 0Ideally, you should see a notification that says “Disabled,” which (confusingly) means that TRIM is enabled, as shown below.
5. Check that System Restore Is Enabled
In the early days of SSDs, when they were much less durable than they are today, many people recommended turning off System Restore to improve the drive’s performance and longevity.
That advice has become redundant. System Restore is an extremely useful feature that we recommend keeping an eye on, so it’s worth going to your settings to confirm that your SSD hasn’t disabled it on the sly.
Click Start, type “restore,” then click Create a restore point.

Next, select your SSD, and click Configure. Ensure Turn on system protection is selected.
If System Restore isn’t working right, learn how to fix System Restore not working on Windows.
6. Keep Windows Defrag ON
Another relic from the early days of SSDs, defragmenting, was not only unnecessary but potentially damaging to the SSD, as defragging chipped away at the number of read/write cycles left in the drive.
That’s kind of true, but Windows 10 and Windows 11 know this already, and if you have enabled scheduled defragmentation, Windows identifies your SSD and defragments it (as, contrary to popular belief, SSDs do get fragmented, albeit much less so).
It’s better to think of today’s defrag option in Windows as more of an all-around disk-health tool. (Even Windows now refers to the process as “optimization” rather than “defragmentation.”) The process will also “retrim” your SSD, which runs the lovely TRIM function we talked about earlier.
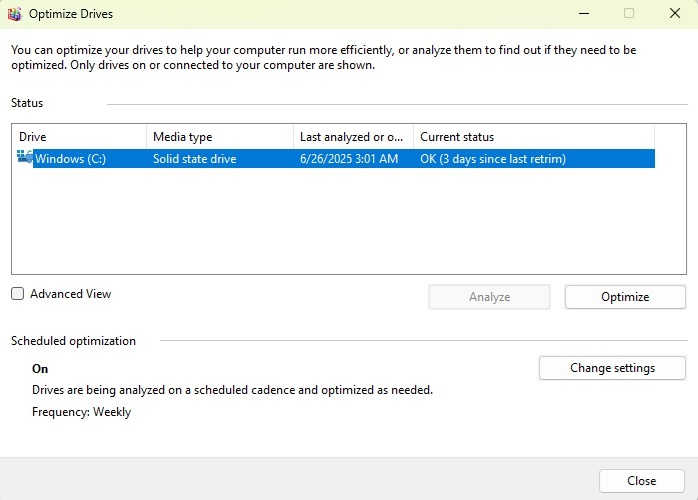
In other words, Windows defrag adapts to your SSD, so keep it on! Go to Start, search for defrag, and click Defragment and Optimize Drives. Select your drive and ensure Scheduled optimization is on. If not, click Change settings to enable it.
As a word of caution, avoid third-party defrag tools that may not work correctly with SSDs.
7. Configure Write Caching
On many SSDs, user-level write caching can have a detrimental effect on the drive. To figure this out, you’ll have to disable the option in Windows and see how the drive performs afterward. If your drive performs worse, enable it again.
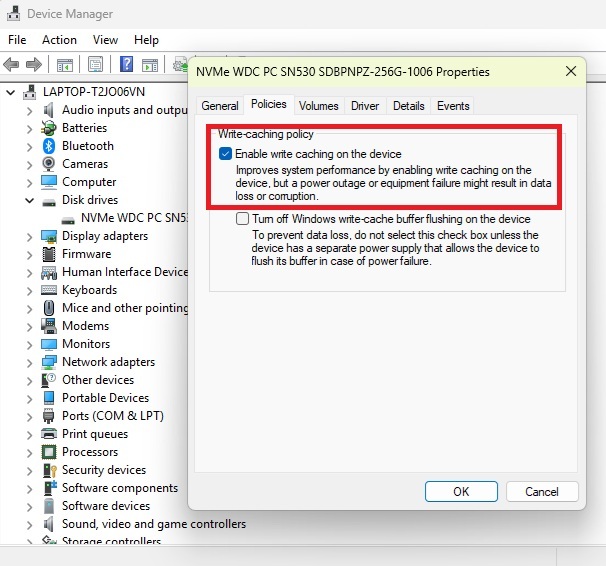
To reach the configuration window, right-click the Windows button, and select Device Manager. Expand Disk drives, right-click your SSD, and select Properties. In the Policies tab, check the box next to Enable write caching on the device. Benchmark your SSD with and without the option and compare the results.
8. Set the “Best Performance” Power Mode
When your SSD powers on and off all the time, you’ll notice a slight lag whenever you use your computer after it has been idle for a while.
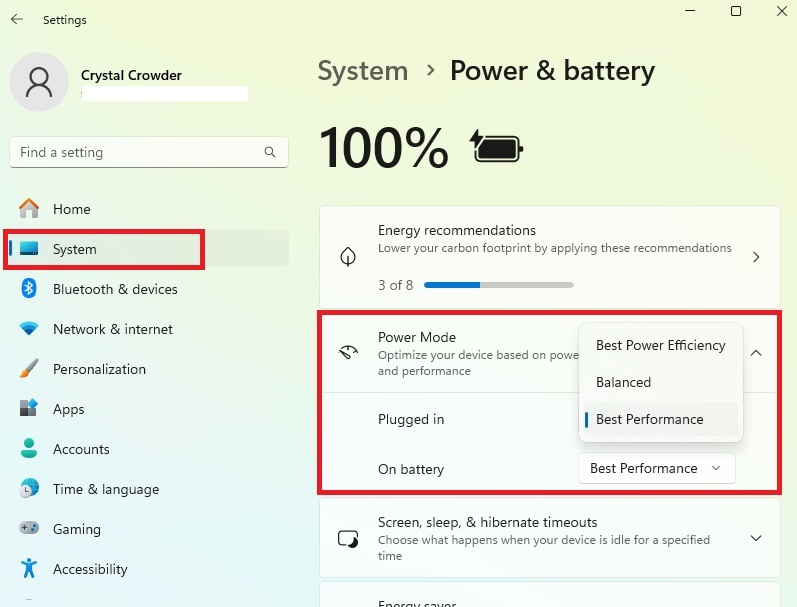
Press Win + I, select System -> Power & battery, and expand Power mode. Select Best performance from both the Plugged In and On Battery categories.
If your battery’s dying too quickly, you might want to opt for Best Power Efficiency instead. Or go for Balanced as a mix between the two.
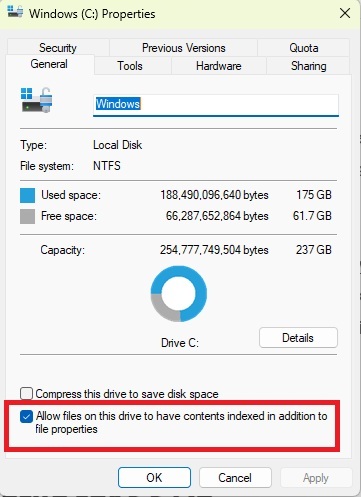
9. Disable Indexing
By default, Windows indexes your drive data to make search faster whenever you’re looking for something. Disable indexing on your SSD if you don’t use the search function much.
To do this, open File Explorer, click My PC in the left pane, and right-click your Windows drive (usually C:). Select Properties. In the General tab, uncheck the box next to Allow files on this drive to have contents indexed in addition to file properties. Click Apply to save the changes.
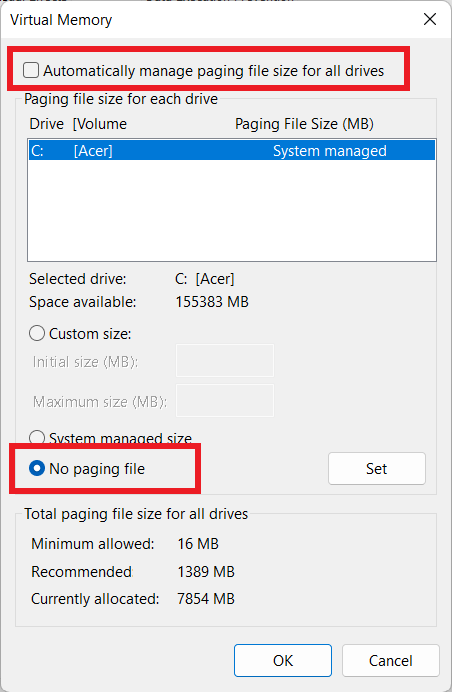
10. Disable Pagefile for SSDs
Windows automatically manages the pagefile size for every drive, and uses the file to dump the least-used files whenever it starts running out of physical RAM. In cases where you have more RAM than you need, disable the pagefile on your SSD to release the occupied space.
Press Win + X and select System. Click Advanced system settings under Related links. Click Settings under Performance.
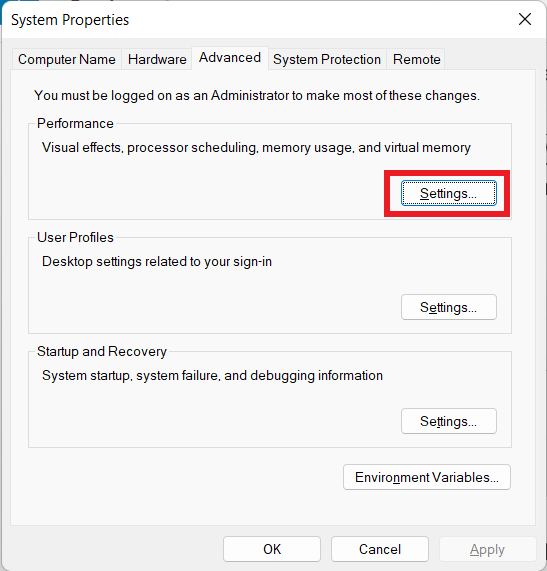
Select the Advanced tab, and click Change in the Virtual memory section.
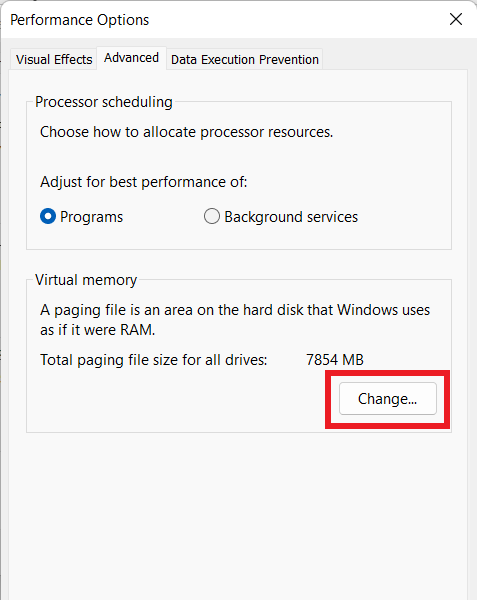
Uncheck the Automatically manage paging file size for all drives, select your SSD, and select No paging file.
11. Avoid Sudden Shutdowns or Power Loss
SSDs don’t do well when they suddenly lose power. Shutting down your PC incorrectly, having a power surge, or suddenly losing power could all ruin your SSD life.
Always shut down your PC properly. If you’re using a laptop, ensure you never let the battery die while using it. For desktops, consider using a UPS (universal power supply) to avoid power loss during a power outage.
12. Check Your SSD Health
SSDs have issues from time to time, just like traditional HDDs. Monitoring your SSD’s health regularly helps you ensure something’s not wrong. For instance, you might discover damaged areas or your PC’s running too hot. From built-in tools to third-party apps, there are multiple ways to monitor your SSD.
For macOS users, try these utilities instead. Linux users also have a variety of SSD health check tools.
13. Use Your SSD Regularly, But Don’t Fill It Up
Unlike HDDs, SSDs aren’t meant to sit on a shelf. They need to be powered on regularly or it shortens the SSD life. For devices you don’t use often or external SSDs, make a schedule to power them on at least two or three times a month.
Also, don’t cram them full. You’ll notice major performance issues when you get to about 80 percent full. Plus, if it’s your system drive, Windows needs roughly 20 percent of your drive to stay free. Most SSDs have overprovisioning in place to prevent overuse, but try not to treat your SSD like an overstuffed suitcase for best results.
The best SSDs offer blazing-fast system performance, compared to conventional hard drives, whether you’re gaming or using creative applications. There are many things to consider when buying an SSD, but the most important are the interface (SATA, NVMe) and whether it’s a DRAM or DRAM-less SSD. Once you’ve chosen one, take steps to extend your SSD life to get the most for your money.


